3.30.2011

can i go to prom too?

iphone
This past Saturday we went prom dress shopping with our little sister Emily. We found this really fabulous sparkly short dress that would be perfect for prom, it made me wish i was going too!
iphonepics
We headed over to Neiman Marcus to see what we could find and we found the most amazing dresses ever! We even saw the Halston Heritage one-shoulder dress Carrie Bradshaw wore in SATC2...fabulous! 
iphonepics2

PS: meet my precious iPhone, her name's Apple. How Gwyneth Paltrow of me to name my child Apple, but the name totally suits her don't ya think! 
rsz_pics2

3.29.2011

won-TURBAN-ful

tutorialtues
Welcome to my last tutorial tuesday, I am so excited about this one. Since our theme this tuesday is spring, i decided to do one of the most popular spring trends, a turban headband! I'm doing 3 styles, a bow turban, knot turban, and a hole turban. They look better then they sound trust me...

Hole Turban
This particular turban has a hole in the middle, hence the name hole turban, sorry my creative juices weren't really flowing when i named it. I used a stretchy headband i already had, i just cut it in half, but if you have any sort of stretchy fabric you can use that too.
turban
Step 1- cut your headband in half, or if your using stretchy fabric cut it to make a long strip. If your using a fabric, you'll need to sew it so you don't see the raw edges (i use fusible webbing, it's really easy)

Step 2- Take the first end of the fabric and feed it through the key ring, spread the fabric out so half the key ring is covered. Pin it in place. Then do the same to the other side of the key ring with the other side of fabric.

Step 3- Now your ready to sew the fabric around the key ring, make sure to only sew through one layer of fabric (you don't want the thread to show on the fabric in the front of your headband). It's much easier if you pinch the two pieces of fabric your sewing together, it'll act as a guide. 

Step 4- Once you've sewed the fabric around the key ring, you can take the pins out!

It's now ready to wear.....Here's how mine came out....
105_2214


Bow Turban
The next turban is super cute, i really love it! I just used an old camisole. If you have a old shirt that has stretchy fabric you could use that too, or if you want to use a stretchy fabric thats good too!
turban3

Step 1- cut a big section of your cami (side to side) or if your using fabric just cut it like in the hole turban. Next if your using a cami, cut where the seam was to hold the shirt together, you should now have a long strip.

Step 2- Now you'll need to either sew or use the fusible webbing to bring the two raw sides together. I recommend using the fusible webbing, all you need is an iron. You'll need to do it inside out (sewing or using fusible webbing) and then just turn it right side out when it's together. 

Step 3- After the two raw sides are together you should have one long strip. There should be a seam left in the middle (if you use a cami) If there's not don't worry. Now you'll want to get your needle and thread ready. Weave the needle and thread either on the seam or just in the middle of the strip.

Step 4- Once the needle is weaved all the way through the fabric, pull it taught. It should look scrunched.

Step 5- Now determine how tight your turban should be, then cut it to the desired length, and sew the two ends together.

Now it's done! Here's mine.....
105_2219
Doesn't it sorta look like a bow in the front, hence the name!


Knot Turban
This turban looks the most traditional, and is probably the easiest. 
turban2

Step 1- Follow Step 1 and Step 2 in the bow turban. except double it. You'll need two long strips.

Step 2- After the two raw sides of the two strips are together you should have two long strips.

Step 3- Now take the two long strips and make them into a cross. 

Step 4- Fold one side over to the other making sure the other strip is hooked in between the other strip. 

Step 5- Now Fold the other side over, and it should look like a knot in the middle.

Step 6- Now determine how tight your turban should be, then cut it to the desired length, and sew the four ends together.

Dunzo! Here's mine.....
105_2213

Phew....we made it! All three are done, Now go rock your turban!

I will try to post pics of me actually wearing the turbans tomorrow, i've just been so busy making 3 turbans and all :)

rsz_pics2

Hair-Tastic!

tutorialtues


Happy Tutorial Tuesday Everyone! I have to admit I'm a little sad that this will be my last Tutorial Tuesday at least just for a while. But what better way to go out than sharing my favorite SPRING hairstyles. These hairstyles were all the rage at Fashion Week and they are incredibly easy to recreate. All you need is a comb, a curling iron, and your choice of barrettes or bobby pins.

hair


The first hairstyle is a chic supreme side part. This look is great for any length of hair. You can wear it however it works best for you, a sleek pony tail, pinned to the side with curls (using a barrette or bobby pins) or just a sleek and shiny down do. Refinery 29 had a great article on getting the perfect side part. Place a comb flat against the side of your head. The spot where your head leaves the comb is where the part should be placed. Its that simple. So go ahead rock that side part like there's no tomorrow!


The next look I absolutely love is fluffy curls. I'm from texas so I know a little bit about big hair, but this look allows me to embrace my frizziness. You can choose to let your hair air dry or use a curling iron but the trick is to brush out the ends of your curls for that bouncy fluffy look. I like to put a little bit of styling cream on my hair so it doesn't get out of control.
103_2170
103_2182


These new looks have me so excited for spring! Now all I need is some bright colors, wacky and colorful prints, and a good pair of trouser jeans and I'll be all set for spring 2011.


rsz_1pics

Eggcellent mask!

tutorialtues


So its been very hot here in Texas, up in the mid 80's (be jealous east coasters) and of course in the heat my skin tends to get very oily. So keeping with our Spring themed Tutorial Tuesdays I decided to do this egg mask, yes I said EGG, to help control your oily skin on those hot spring/summer days.


eggwhiteyolk
       
All you need is 1egg, Yep that's all folks 1 egg! And a clean face. Easy huh? Of course you will have to seperate the egg whites but I assure you this is very easy.
Crack the egg and transfer the egg yolk back and forth letting the egg whites fall into a seperate container.
Then of course put the egg yolk in another container. You will then have to beat the egg whites, make sure you beat them till they get frothy. When you see bubbles you will know they are ready.


Smear the egg whites all over your face making sure to get a little extra on the areas that get a little more oily than others. Mine is my "T" zone.
Once this is on your face allow time to dry. You will know when its dry when you can't smile and your face will feel tight. Wipe clean with warm water and a bath cloth.


After the egg whites comes the yolk. You will smear this all over your face just as you did the egg whites. Its going to be the same process. The egg yolk will act like a natural moisterizer.
Leave time for the yolk to dry. Once its dry wipe clean with warm water.
Use your daily moisterizer as the final step
Ta-dah! you will have soft smooth oil free skin all day long!
Good Luck!!


**check out Michelle Phans tutorial on thsis mask (she was my inspiration)


rsz_pics1

3.28.2011

So Long, Farewell...

tutorialtues


We're sorry to see it go but its not goodbye forever, just see ya later. Tomorrow will be our last Tutorial Tuesday. I know I know cry if you must it is very sad, but we will just be retiring it for a little while. It will make a comeback so make sure to keep a look out. Because this will be our last one we decided to each do our own seperate tutorial, ya know to keep you satisfied while it's on hiatus. It's bitter sweet but we have plenty of new stuff coming your way so make sure to check out all our new posts, especially next week. We are gonna be celebrating Fiesta in our great city of San Antonio and our blog will be the place to see everything go down!!! 

Viva Fiesta!! Adios Tutorial Tuesday


LKM


polka-dots, tribal, stripes OH MY!

magazonday
Happy Magazonday Folks!

 This monday i was inspired by Teen Vogue magazine. In this particular issue they had an editorial called "RUNWAY: OUR WAY". They take a particular trend & show how the Runway styled it and then they style it themselves. Well this look, i'm styling!

This look is a take on the trend: Piled on Prints...up there (at the top of the post) is how the RUNWAY and Teen Vogue styled it & here's how I styled it.....

pics
{shirt, dress-Forever21 shoes-vintage, necklace-JC Penny}

I love, love, love stripes, they are such a basic and can be paired with almost anything. I paired it with this tribal looking print, I think they really tie in well together. Finally i extended the print all the way down to the feet. I love these polka-dot slingbacks sooo much, plus they are not too loud so they add just the right little touch!

Who knew piling on prints could be so much fun!

rsz_pics2

3.27.2011

Flower Power X's 10

As I type I have perfectly manicured nails that took no time at all and required no drying time or a two coat process. Its the new Sally Hansen Salon effects nail polish strips! I think I've fallen in love, with my nails of course. Their gorgeous and the easiest nail polish ive ever put on my nails. I love you Sally!

I chose the Flower Power strips because well look at them they are so cute and because their the perfect way to jump into our Spring themed Tutorial Tuesday's!!!

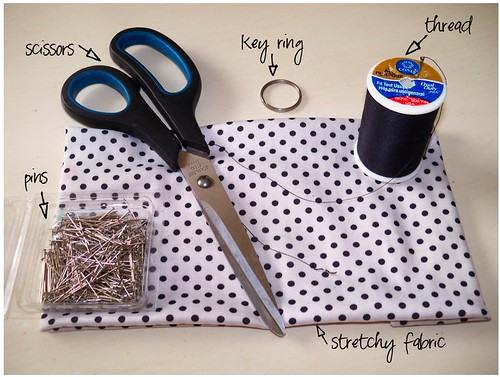
All the supplies you need comes in the box which is great just in case you dont have any of your own. There are 2 packages of strips with 8 in each so just in case you mess up you have plenty of back ups. Theres a cuticle stick, of course for pushing your cuticles back and getting the excess off the sides of your nails. And then a 3 sided file. The hot pink side is to file your nails before the strips, The grey side on the back is to smooth any ridges before you put on the strip, and the light pink side is to file off the excess strip after you put it on!


Ok so you need to take off all the nail polish you had on before start with clean nails wich of course is a no brainer!!


Push your cuticles back using the cuticle stick provided in the box for you, or of cousre feel free to use your own if thats what you perfer. Also make sure to get the sides of your nail as well.


File your nails down to your desired length. If your using a pattern on your nails (like the flowers) a shorter square nail looks best. But of course if you love the long nails go for it girl!


Using the grey side of the file that is provided, smooth over the entire nail to get rid of any ridges on your nail I would suggest to do this for about 20 seconds on each nail. It should look smooth and shiny when your done. When your done take a cotten ball with nail polish remover on it and swab down each nail to get rid of any excess dirt left behind. This pert is very important!!! You need to start with clean nails!


Find the strip the best fits your nail. There are plenty of different sizes so make sure to find the best one. Once you've found it peel off the strip and place it on your nail. Make sure to get it right up to the cuticle and smooth it out to the end of your nail. You can stretch it to the end of your nail just make sure not to pull to hard. Take your finger and smooth the entire nail to get to strip flat and smooth. Fold the endge at the end of your nail to get a crease so you'll know where to file.

File the excess strip off at the edge of the nail. If there is some of the excess strip hanging on the sides of your nail use the cuticle stick to push the cuticles again. This will cause the strip to break in the desired area and you will be able to peel the excess away. This will creat the desired finished look!!! 

 I decided to rebel and add a top coat just for extra staying power and shine!! Once all the steps are complete you'll have perfect manicured nails!!! I know you will enjoy these just as much as I do. Good Luck! Now go strut your stuff with those gorgeous nails!!!


rsz_pics1


3.25.2011

where have you been all my life?


So, I have apparently been living under a rock my whole life. Hi, my name's Katy & i've never been in an ALDO store. Tragic? I think so. I work right across from an ALDO & always salivate at it's beautiful things, they have the cutest shoes, hats & purses. 
After checking out there website, i decided a visit is a must

Here are some of my favorite ALDO items...

1. Forwood Medium Green wedge $90.00
2. Diroana Navy cross-body bag $40.00
3. Dyle Light Yellow wedge $100.00
4. Cypert Beige handheld bag $45.00
5. Frimoro Camel wedge $80.00
6. Araucaria Bone clutch $40.00
7. Lampe Cognac sandal $60.00
8. Schwieson White/Black handheld bag $40.00
9. Catalan Bone High Heel $80.00


rsz_pics2
Related Posts Plugin for WordPress, Blogger...