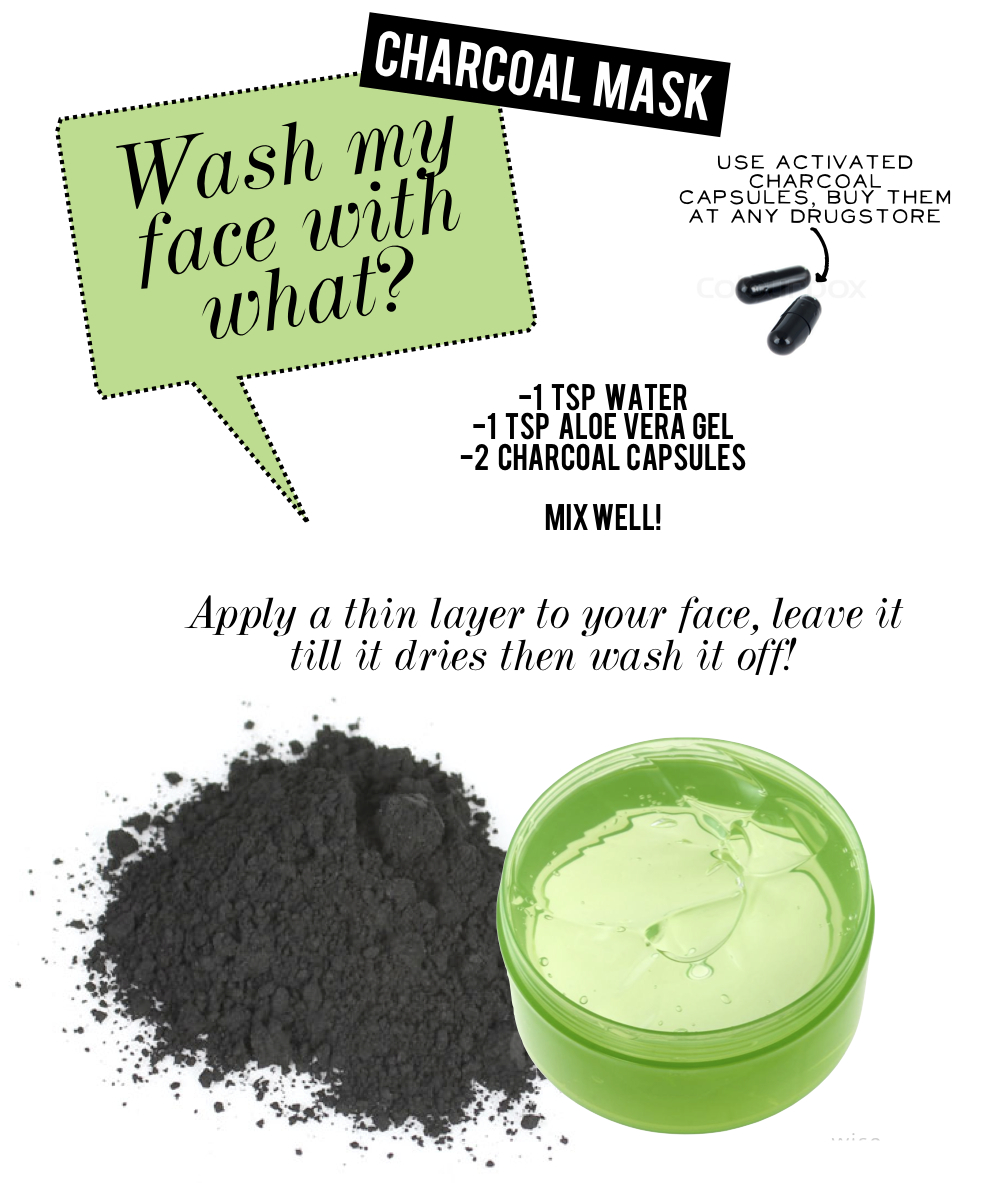
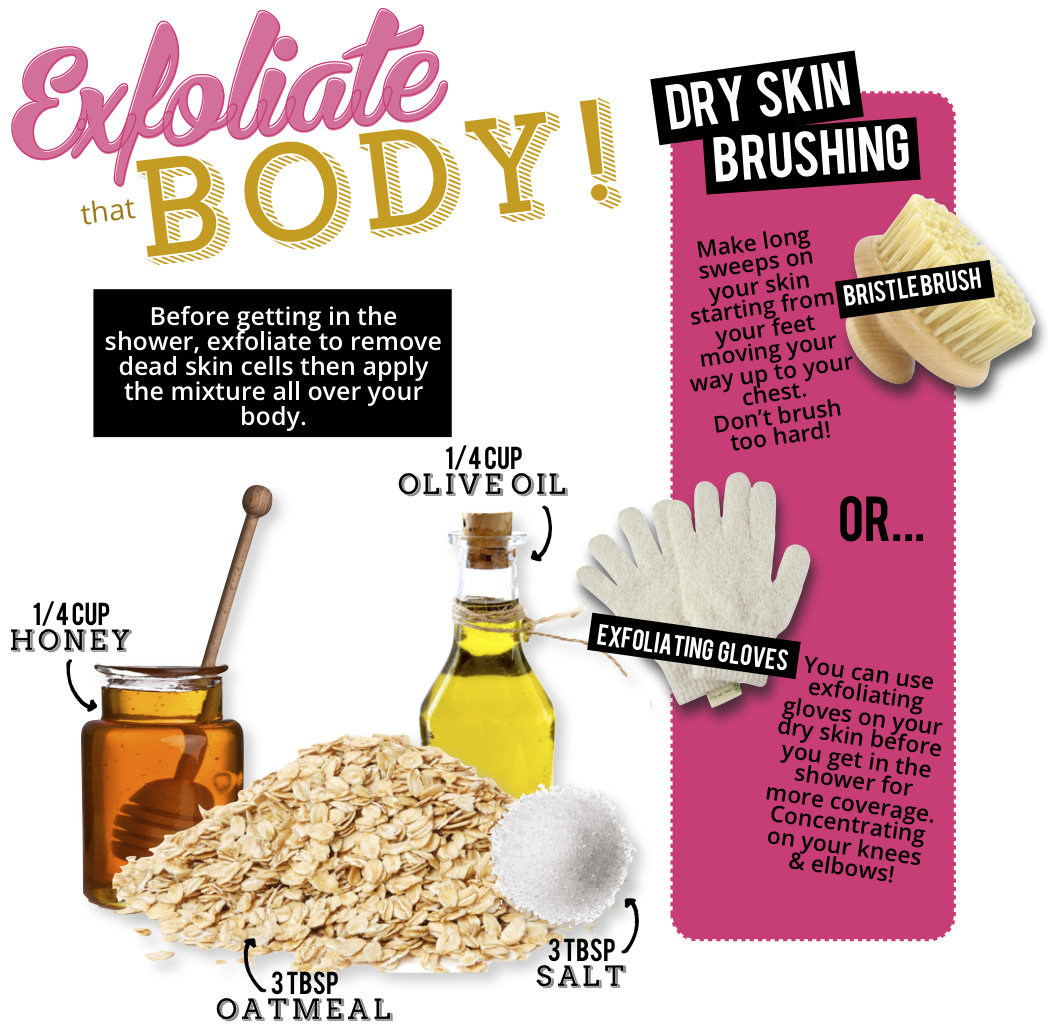
Your kitchen is filled with ingredients to not only make meals but to make fabulous beauty products that ACTUALLY work. If you have sugar, olive oil and honey you already have a great exfoliator but the great thing is you can add some zest of a lemon or orange or add some essential oil and bam it smells wonderful! You can make sooo many beauty products in your kitchen it's amazing. Products like this get you ready for those shorts and tank top wearing months. New and bright skin is right around the corner!
Showing posts with label DIY. Show all posts
5.14.2014
4.16.2014
3.28.2014
The Secret Behind Dry Exfoliation
What if I told you that you could get rid of cellulite just by brushing your skin? Got your attention huh? Ok listen up ladies I read a few things about this method in Shape Magazine.
:Dry brushing increases the circulation to the skin which COULD possibly reduce the appearance of cellulite. Cellulite is toxic material gathered up in your body’s fat cells. So, instead of taking drastic measures like liposuction, just utilize the dry skin brushing techniques to help break down unwanted toxins?
This may sound to good to be true! Basically all you have to do is take a few minutes before you get in the shower or just in your spare time and brush your skin. Not only does it help to break down the fat cells it also gets rid of the dry skin to show off your new, radiant skin. It makes your skin feel alive!! You'll just see all those nasty dead skin cells fall off and after you apply a body oil you'll be screaming "hallelujah."
I found this method at the perfect time. Everyone (including me) are trying to get beautified for spring/summer and this method does two things at once. I know it may sound harsh for your skin but trust me it's all worth it! Do this method daily for a month and once you start to see those "dimples" go away you'll be really happy you tried it out. I'm VERY into exfoliating dry skin, heck I even exfoliate my dry face. For the record my face feels
A-M-A-Z-I-N-G!!
I found this method at the perfect time. Everyone (including me) are trying to get beautified for spring/summer and this method does two things at once. I know it may sound harsh for your skin but trust me it's all worth it! Do this method daily for a month and once you start to see those "dimples" go away you'll be really happy you tried it out. I'm VERY into exfoliating dry skin, heck I even exfoliate my dry face. For the record my face feels
A-M-A-Z-I-N-G!!
Labels:
beauty
,
DIY
,
dry brushing
,
dry exfoliation
,
how to
,
skin
,
spring
,
spring beauty
,
summer
,
summer beauty
1.14.2014
How to exfoliate for better, brighter skin
Brand new year means brand new beauty habits right? Well I learned a pretty great one from TBD. I had actually heard of this "exfoliating dry face technique" before but I was a little scared to try it. Wouldn't that harm my skin? Actually NOT! It has changed my skin for the better. Just wet your finger tips, take a face exfoliator and rub onto your dry face. Keep in mind when you exfoliate your face you don't need to rub extremely hard to make that "penny shine." Just rub your forehead or your chin for a little longer you'll get those great results without the rug burn. You can even use your palms to rub your cheeks if you need to for a little better coverage. This technique promotes new skin growth and puts your best face forward. So all those pesky dark spots or that dry skin, be gone! After one use you'll feel the difference.
10.31.2013
Fresh FALL face by H.E.B
Fall is officially here, and with fall comes new makeup choices. We're well aware that in Texas it's still 88 degrees but just because it still feels hot doesn't mean our faces can't look fall like! This time of year we want to wear deep reds and purples on our lips, a great smokey eye and the perfect flushed cheeks. Lucky for you H.E.B carries everything you need.
We compiled some of our favorite products from H.E.B that you can use to put your best (fall) face forward.
We'll start with the eyes. L'oreal's color riche shadow quad in "stacked heels" has the perfect colors for fall. You can keep it light for the day if you want and build the intensity for a night out on the town. Also, purple compliments brown eyes perfectly.
Coat your lashes with L'oreal voluminous mascara. Your lashes will be full and beautiful with no help from falsies.
Move further down on your face to your cheeks. Use Physician's Formula multi colored blush in "blushing rose". It's SUCH a great color. It leaves your cheeks looking flushed, which is great because out in the cold your cheeks will naturally have a pink tint. This blush just helps out. No one wants to look like a clown right? Right!
And now my favorite, lips! We are loving this Cover Girl jumbo gloss balm in "plum twist". This is the perfect wine color for your lips. It looks great on every skin tone and mouisterizes your lips for those chilly fall days. Plus, who doesn't love a color that reminds them of wine?
This look is great for day or night so try it out all together or any item separately. All the products are great, an even greater that you can purchase them at your neighborhood H.E.B!
9.16.2013
Homemade Pumpkin Spice Syrup
Are we jumping the gun by posting a recipe for pumpkin spice syrup? No? OK good. We know in Texas its going to continue to be hot until October but we figure if Starbucks can start selling their pumpkin spice lattes than we can surely post about it. We think after Labor Day it should be mandatory that all the leaves change colors, the weather stay at a cool 60 degrees and nobody looks at us like we have two heads when we walk out of the house with a scarf on. Is that to much to ask? I think not. Surely mother nature can surely handle that. The holidays is our favorite time of year. Its snuggle weather (with our cats of course) so everyone wants to be inside. We are notorious hot chocolate makers so we thought of making this syrup to spice up any of our hot beverages. We are all about easy recipes, seriously the least amount of steps the better and this recipe delivers. Other homemade pumpkin spice syrup recipes call for you to blend the milk and canned pumpkin. Not this one! Plus you can keep it in your refrigerator for weeks and it will still be good! This syrup is great because you can use it with soooo many drinks, hot and cold. We've tried it with hot chocolate and regular hot coffee but you can surely have it with iced coffee or blended coffee's like frappacinos. Nothing says "fall" like a pumpkin spice beverage so make some syrup and go carve a pumpkin or something. Happy syrup making!
5.24.2013
A special guest post
Those of you that are loyal Style Dossier fans know how much we love our homemade beauty products. It's amazing how products found right in your kitchen can make you feel luxurious, just like a spa would. We've partnered with Michelle Pino, who just happens to be a manager at Skana Spa in upstate NY, to give out some of her amazing DIY beauty treatments. Go on ahead and pamper yourselves, we sure are!!
Pamper Yourself With "Me" Time At Home
Moms always have the perfect answers to everyone’s dilemmas, and the strength to take care of every member of the family. No one ever said being a Mom was easy, and there will never be sufficient minutes in the day, but when there is already too much on your plate, and you have lost the teleportation machine that allows you to be in two places at once when will you possibly find the opportunity to take care of yourself? The answer is – the time has to be made to do it; even if it is simply stealing a second or two while everyone else is sleeping.
With summer right around the corner everyone wants to be beach ready. Winter can do a number on your skin and visits to a spa are not always in the budget. Howeverwith a little creativity and a few simple ingredients you probably have in your pantry already, the luxury of a spa can be had at home for when those prized moments arise. As women and mothers we work hard and deserve to take a little time to pamper ourselves. Before the personal gas tank runs on empty, take a moment or two to recharge those batteries with one of the easiest DIY body scrub recipes you can find. It only takes a minute to make which is perfect because sometimes that's all you have.
What you'll need
Approximately 1/4 cup table salt or sea salt depending on your preference
Olive oil, however, grape seed oil can be used as a substitute if preferred
A small plastic container for mixing
Essential oil of whatever scent you choose - optional
Instructions
Pour the salt into the plastic container
Pour the oil in just until it passes the top of the salt. Addthe essential oil if you choose
Mix it thoroughly
Spread over your body
Rub in gently with your fingers. Make sure not to rub it in too much, salt is an excellent exfoliate, and can be abrasive to those who have more sensitive skin types
Rinse off thoroughly
Reveal your new skin
Grape seed oil can be substituted for the olive oil. The advantages of using it instead are that grape seed oil includes nutrients that are great for your skin such as Vitamins E, C, and Beta-Carotene. Grape seed oil promotes healthy cell structure and prevents and heals stretch marks. While olive oil might do an adequate job here in moisturizing your skin, the bonuses of grape seed oil make it an effective replacement.
This recipe does not have a shelf-life, so only make enough of the mixture for an individual use. Skin will seem like it's been given new vitality and the recipe does not get any more simple to make. You will be surprised with how vibrant and smooth this mixture will leave your skin looking and feeling. Remember to put yourself on the list of things that need to be taken care of and before you know it, you will be back up and running full speed ahead.
________________________________________________________________________
Michelle Pino, is a Spa Manager at Skana, a spa in upstate New York at the Turning Stone Resort and Casino in Verona, NY. She enjoys DIY projects, healthy recipes, exercise, and all things related to skin care. If you have any comments or questions feel free to contact Michelle via email at michellepino@turningstone.com
5.01.2013
Silky Smooth Legs
It's finally time ladies. Time for your legs to come out of hiding. Those bright colored skirts & lacy shorts now have their time to shine! We have something pretty great to pair with those short shorts. How about the silkiest legs ever? Trust me you won't be able stop touching your legs because they are so soft. This little concoction is made with three ingredients found in your own kitchen. It exfoliates & softens legs at the same time. Just mix up the ingredients, apply to wet legs, shave. Rinse legs & repeat the process once more. It's that simple. You don't necessarily have to do this every day either, just when you want those extra sexy legs. Which might just be all the time when you discover how great this is. In that case, Go for it girl!
PS: We'll be guest posting beauty tips every month for our friend Tanvi! This was our first post for her blog so make sure to go show her some love!
7.12.2012
How To Do Water Marble Nails
WARNING if you don't have a whole lot of patience we suggest you step away from the computer. This tutorial can be a little challenging & take up a LOT of time. Luckily we had a few hrs to kill, & trust us it took us a loooong time to get this tutorial right. We've done just a few nail tutorials but this Missoni nail was by far our favorite. Katy & I were wracking our brains on which nail tutorial should be next. Why not Water Marble nails? The only thing is we heard it was hard (everyone was right by the way) But you know what after all the complaining the nails actually turned out pretty damn cool!! Every design is different so you never know what you're gonna get. We chose to just do it as an accent nail but if y'all want to try & do all of your nails more power to ya!
7.10.2012
We have the golden ticket (part deux)
Makeup is so much fun in the summer. Bright lips, fun eyeshadows, bronze skin. This makeup look has all three. It's a fun take on our vintage post plus it's PERFECT for summer. For this look you only really need three products. A nice gold eyeshadow, a bright pink lipstick & a rosy peachy blush. Those colors just scream summer! This look took less than 10 minutes. In our opinion why would you want to spend more than 10 minutes on your makeup in the summer. Wouldn't you rather be sipping drinks by the pool?
STEP 1. Prime your eye lid. Apply any gold eyeshadow that you have all over your top lid
STEP 2. Apply a rosy/peachy blush on the apples of your cheeks
STEP 3. Apply your bright pink lipstick
STEP 1. Prime your eye lid. Apply any gold eyeshadow that you have all over your top lid
STEP 2. Apply a rosy/peachy blush on the apples of your cheeks
STEP 3. Apply your bright pink lipstick
6.15.2012
Tootsie Footsie
Are y'all ready for all those summer shoes? We sure are, but who are we kidding we pretty much wear open toed shoes year round here in S.A. Being the little diy-er's (I just made that word up) that we are, we have a few foot scrub recipes that are super easy to whip up at home. They'll leave your feet looking sandalicious!
Check back next week, we'll have a diy pedicure! Oh yeah you're feet will love ya' all summer long :)
5.22.2012
DIY Neon Necklace
I have been lusting after the Ann Taylor neon lights necklace ever since i saw it. The price tag was a bit much for me, so i decided to try and tackle it on my own. It was so easy to make i even made a neon yellow one! If you've been dying for that necklace too but don't wanna shell out $100 bucks this diy is for you!
3.19.2012
How to make an Insect Brooch
I have been lusting after insect jewelry since the beginning of the year. I first saw this necklace from Topshop on Cheetah is the New Black, and then i saw this really awesome brooch the Man Repeller was sporting! I decided i would try to make something rather than spend a ton of money. I think my insect brooch came out pretty good, especially because it cost under $10 to make! I've been wearing it on my purse and it is quite the head turner! If you try this Good Luck!
1.16.2012
Makeup Monday: Gradient!
So last week I was sifting through Seventeen magazine, and yes I still read Seventeen. Maybe not the prom issue, that would be weird. I came across these gradient lips and I practically fell in love. In the magazine they look so much more awesome. But it gave me the idea to share them with you. This look is a little more toned down then in the magazine but still interesting enough to be cool.
I'm just showing the lips this time because well, all the rest of the makeup should just stay simple-like this!
Step 1: Take a coral lipstick and apply this all over your lips.
**make sure to blot after each application
Step 2: Apply a fuchsia color on top but only to the center of your lips and smudge out with your fingertips.
Step 3: Take an orange color and add it to the very center of your lips. Smudge a little out with your fingertip also.
You can add a gloss or keep it matte, your preference.
Get funky and creative with it also and try some different colors!!
Step 3: Take an orange color and add it to the very center of your lips. Smudge a little out with your fingertip also.
You can add a gloss or keep it matte, your preference.
Get funky and creative with it also and try some different colors!!
12.14.2011
Holiday Hairstyle.....Embellished Headpiece
Hi everyone! Wow Christmas is coming so fast, we're already on our holiday hair tutorial #3. This time we're showing you just one way to wear an embellished headpiece. Around the holidays I love to wear anything that sparkles. Headbands, hair clips, bows & the list goes on & on! You can wear an embellished headpiece with any type of hairstyle this is just one holiday hairstyle that I loved.
You'll need:
root lifter
teasing comb
bobby pins
embellished headpiece
Step 1. Spray a little root lifter into your roots. Take your teasing brush & tease your crown.
Step 2. Gather one small piece of hair on your left side, bring it to the right side & pin onto your head w/ a bobby pin. Do the same with a piece of hair on your right side. Your making a criss cross motion.
Step 3. Continue the criss cross motion with your hair. Remember small pieces of hair work best.
Step 4. When you pin down your hair try your best to hide the bobby pins underneath your hair.
Step 5. When you've criss crossed your hair all the way to the bottom take a small piece of hair from underneath & wrap it around the loose hair on the bottom to create a ponytail. Take a bobby pin & securely pin that piece of hair underneath.
Step 6. When you've secured your ponytail you can start to take out a few bobby pins that may be poking out. I only take out about 2 or three. Remember you don't want the whole thing to fall out but it can "lay loose"
Step 7. Add your embellished or sparkly
We're working on hopefully doing some DIY's for some sparkly, fun headpieces for the holidays so stay tuned!
Labels:
accessories
,
beauty
,
DIY
,
get the look
,
hair
,
holiday hair
,
holiday's
,
how to's
,
top 5 hairstyles
,
tutorials
12.09.2011
Holiday Hairstyle.....Va Va Voluminous Curls
Hi friends! The holidays are just a few weeks away and if we could we'd make sure to get everyone of you a gift but we have the next best thing......tutorials! Lots of holiday hair tutorials. We posted our Top 5 Holiday Hairstyles and we can't wait to bring our "How To's" your way. First up volumized curls & lots of them.
You'll need:
heat protectant
curling iron
bobby pins
teasing comb
hairspray
Step 1. Spray your hair all over with a heat protectant.
Step 2. Section off your hair & start curling 1 inch pieces of hair away from your face.
Step 3. After you curl each section take your bobby pins & wrap your hair around your finger. Pin the hair onto your head securely.
Step 4. Leave the bobby pins in for about 15 minutes allowing your hair to cool. Fell free to do your makeup during this time.
Step 5. Once all of your hair has cooled down take out your bobby pins.
Step 6. After all your bobby pins are taken out run your fingers through your hair, separating your curls.
Step 7. Take your teasing comb and start teasing your roots. The more volume the better.
Step 8. Don't forget to curl your bangs if you have any. I always curl my bangs last.
Step 9. Voila' rock those sexy curls!
Stay tuned for lots more holiday hair tutorials, we won't disappoint you!
Labels:
beauty
,
christmas
,
DIY
,
get the look
,
hair
,
holiday hair
,
holiday's
,
how to
,
top 5 hairstyles
,
tutorials
12.08.2011
hot chocolate recipe....hot chocolate heaven
We're always looking for a great hot chocolate recipe. We've tried white hot chocolates, Serendipity's hot chocolate & mint hot chocolate. All by the way are A-MAZING! This year we found another great recipe. This recipe was easy & so incredibly delicious. This was hands down one of the most decadent hot chocolates we've ever had. It was incredibly chocolaty & so delicious.
Anything with chocolate & I'm in heaven. Yup it's by far my weakness (if y'all can't tell by now) Oh & by the way these cookies are incredible! It only has 5 ingredients so you know its simple but very tasty. The main ingredient is Nutella, now who deosn't like that? I added a few chocolate chips for a little surprise. I like to live on the wild side!
December our oven is working overtime! This Saturday we're spending the whole day baking cookies. Just us girls, about 20 cookie recipes & Bing Crosby blaring on our iPod. This is just one of the many reasons why I love the holidays! If you have any favorite cookie recipes that you would love to share, tweet us or email us we'd love to hear about them.
Labels:
chocolate
,
christmas
,
DIY
,
food
,
Holiday recipe
,
hot chocolate
,
how to
,
recipes
12.05.2011
Holiday Hairstyle....Old Hollywood Glam Hair
Hi y'all! Mandy passed the reins to me today. Instead of Makeup Monday I'm doing "Hair" Monday. I have lots of holiday hair tutorials to show y'all & I just couldn't wait to get started! First up Old Hollywood Glam. It's by far the easiest holiday hairstyle, just three easy steps. Plus it looks great on everybody.
You'll need:
hot rollers
brush
hairspray
Step 1. Heat up your rollers, once they are nice & hot start rolling up your hair. Make sure when you put the rollers in your hair that you tuck your ends under. This will keep your ends nice & smooth. I always roll my hair this particular way.
Step 2. Leave the rollers in for about 15 minutes or until they are cool. I like to do my makeup during this time. Once you take out the rollers gently brush the curls out. Shape the curls to help frame your face.
Step 3. Set with hairspray & you're all done!
This is a great hairstyle for any occasion. If you don't have hot rollers a jumbo 2" curling iron will do just fine. When you release the curl just pin it with a bobby pin & allow it to cool.
*style tip- this hairstyle looks great with one side tucked behind your ear to show off those great earrings
Don't forget to follow us on TWITTER & BLOGLOVIN
Labels:
beauty
,
DIY
,
get the look
,
hair
,
holiday hair
,
holiday's
,
how to's
,
old hollywood
,
top 5 hairstyles
,
tutorials
11.29.2011
Top 5 Holiday Hairstyles
It's that time of year again, the holiday madness has begun. Now that Thanksgiving is over it's time to start thinking about Christmas & yes all those Christmas parties. I usually get stressed out over all the gifts I have to get so I want my holiday hairstyles to be as easy & stylish as possible.
This season its all about the effortless, sexy, classic hair. I guarantee if you rock these five holiday hairstyles @ your next holiday party you'll be the belle of the ball!
Old Hollywood Glam:
Old Hollywood is here to stay & it's so easy to achieve. It's all about elegance mixed with a little sexy.
Think classic & sophisticated. The bouffant is one of those hairstyles that goes great with everything.
Messy curls with lots of volume is a romantic but sexy look, especially for the holidays. The messier the better!
Around the holidays wear anything that sparkles. Especially in your hair, it's a real eye catcher.
Braids are still all the rage from this summer. They work great when you're looking for an east laid back look.
Tutorials are comin' your way soon. I'm so excited to show y'all these looks. They are definitely some of my favorite holiday hairstyles!
Here's to a stylish Christmas & a swanky New Year!
Labels:
accessories
,
beauty
,
DIY
,
get the look
,
hair
,
holiday hair
,
holiday's
,
how to's
,
top 5 hairstyles
Subscribe to:
Posts
(
Atom
)