Showing posts with label nails. Show all posts

9.06.2012

DIY Nail Polish

My dream job would be ANYTHING with beauty. Creating makeup would be a dream come true. Hey what can I say this girl's got BIG dreams!! You know one thing I've learned is it's actually pretty easy making some makeup products. Trust me I've made a few things. This time around I'm making my own nail polish. Just by using some old eye shadow & a clear nail polish. This literally takes 5 minutes to do. Before you know it you have a one of a kind nail polish, pretty great right?diynailpolish


signature_libby

8.07.2012

How to do kitty nail art

When i saw these kitty nails on pinterest I knew I had to try them. They are so easy, and so fun! If you love cats as much as me you'll for sure want to try these!kitty nails Step 1. Paint two pointed lines on the sides of your nail, these will be the ears. 
Step 2. Fill in the gap between the ears with your polish, leaving the tip of the ears poking out. 
Step 3. Using a dotting tool, draw eyes and a nose for your kitty. 
Step 4. Then draw the nose & whiskers using the same tool, use a toothpick if you need to. Done!
signature_katy

7.12.2012

How To Do Water Marble Nails

how to do water marble nails
WARNING if you don't have a whole lot of patience we suggest you step away from the computer. This tutorial can be a little challenging & take up a LOT of time. Luckily we had a few hrs to kill, & trust us it took us a loooong time to get this tutorial right. We've done just a few nail tutorials but this Missoni nail was by far our favorite. Katy & I were wracking our brains on which nail tutorial should be next. Why not Water Marble nails? The only thing is we heard it was hard (everyone was right by the way) But you know what after all the complaining the nails actually turned out pretty damn cool!! Every design is different so you never know what you're gonna get. We chose to just do it as an accent nail but if y'all want to try & do all of your nails more power to ya!
libby&katy

6.19.2012

At home pedi in 8 easy steps

Aaaaah summer you're officially here! It's about time we get to break out the swimsuits, put on our big floppy hats & rock those sky high wedges. First things first, summer's all about having a stunning pedicure. Don't worry we got ya covered!!8_step_pedicure
STEP 1. Fill a bowl with warm water & a handful of epsom salt. Let your feet soak for about about 10 minutes.
STEP 2. Take a foot file (we prefer our ped egg) & gently buff your feet to get rid of any dry skin or callouses. This will leave your feet nice & smooth!
STEP 3. Take a foot scrub of your choice we used "lem-oe-nut", & scrub your feet for a few good minutes then rinse off.
STEP 4. Take your nail clippers & trim your toe nails. Use your nail file to round out the edges of your nails & use your cuticle pusher to gently push back your cuticles. I like to use the same tool to clean underneath my toe nails.
STEP 5. Take your nail buffer & buff every toe nail. Most nail buffers have the steps written on the actual buffer itself. When you take the time to buff your nails it helps the nail polish last longer. Make sure to take a tiny bit of nail polish remover & remove any gunk from your nails before STEP 6, you want your nail polish to go on smoothly!
STEP 6.  Take a base coat & apply it to your toe nail. After that dries paint your toe nails with your favorite color. When the color is good & dry slap on a top coat to ensure the color won't chip
STEP 7.  Take a q-tip & dip it in a tiny bit of olive oil & rub it along your cuticles this helps to moisturize them, also be sure to clean up any stray polish left on your skin!
STEP 8. Grab your favorite lotion & slather some onto your feet, try to avoid your toe nails they may still be wet from the polish!

Hope these steps help you get that rockin' pedicure :)

signature_all

3.26.2012

Spring Nail Polish

nailit
Spring has finally sprung, and its time to bust out our brightest colors! We are big nail polish junkies, and spring wouldn't be the same without adding some fresh new colors to our already huge nail polish collections...here are some of our favs!

butter london- Trout Pout
Sonia Kashuk- Sugar Rush
L'OREAL- Pink Me Up
deborah lippmann- Mermaid's Dream
L'OREAL- Tweet Me
deborah lippmann- Girls just want to have Fun
American Apparel- Summer Peach
butter london- Slapper
essie- Mint Candy Apple
L'OREAL- Butterfly Kissess
REVLON- Coastal Surf
L'OREAL- Boozy Brunch
OPI- Did it on 'Em
Sonia Kashuk- Tango Mango


PS- Can we all agree on how awesome L'OREAL's nail polish colors are, i mean really?!
signature_all

3.07.2012

Going Green!

goinggreen
My nails are forever changing, and lately I've kind of been going through a design phase. One color just hasn't been doing it for me. Since St. Patricks Day is coming up I was thinking about what design I could do on my nails. Voila this is what I came up with! 

Stripes with a sort of gradient effect makes for delicious nails -- right? yes!

(P.S. Sorry for the messed up lines on the finished product, thats what happens when you don't allow proper drying time. I know y'all are smarter than me so I won't worry)

1. Paint your nails with the color you want in the middle of the stripes.
2. Put a strip of tape in the center of your nail (you may need to cut the tape to your liking)
3. Paint your nails with the lightest green on the top part of your nail. 
4. Paint the end of your nail with the darkest green. 
(give a good amount of time for them to dry then peel the tape off)
signature_mandyheart

11.23.2011

French manicure with a twist

During the cooler months i never feel up to doing nail art, i usually stick to one color (dark is my preference) and i'm good. I wanted to try something a little different, so i did a french manicure only i changed up the colors. I really like the way it turned out, plus it takes only four easy steps! 
I'm already wanting to try some different color combos! 
nyafrenchmani
Step 1- Start by painting your nails with a base coat & then with the color of your choice for the bottom half of your mani. I used a brownish grey polish.
Step 2- When your nails are completely dry tape them off, making sure only the tips of your nails are exposed.
Step 3- Make sure the tape is secure on your nail so you get a clean line. Then taking a color of your choice, paint only the tip of your nail. I used black.
Step 4- Wait till the tip of your nail is dry, then slowly peel the tape off. Apply a top coat and Finito!

It's so easy, i hope you give it a try!
rsz_pics2

10.25.2011

DIY: Halloween Nail Art

I've been seeing so many Halloween nail art tutorials lately.....like this, this and this. They've inspired me so much that i wanted to share some of my own with you guys! These are so fun to rock on one finger or, all over. 
nailart
orangecrackle
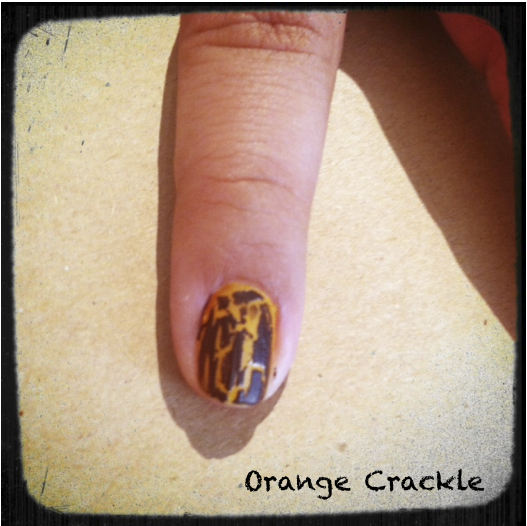
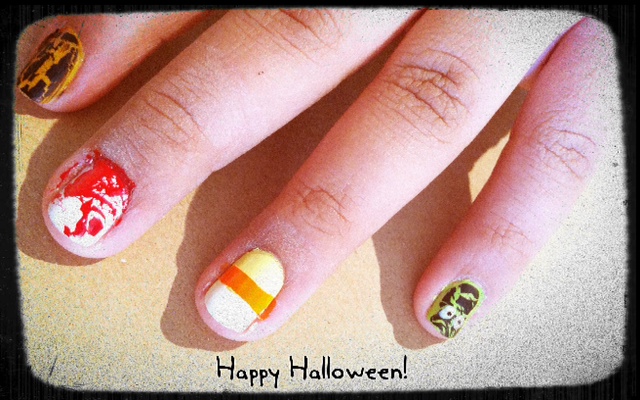
The first and probably easiest is the Orange crackle, if you aren't into all the nail art designs this would probably suit you better!
Just use your favorite orange polish, then top it with a black crackle polish!
candycorns
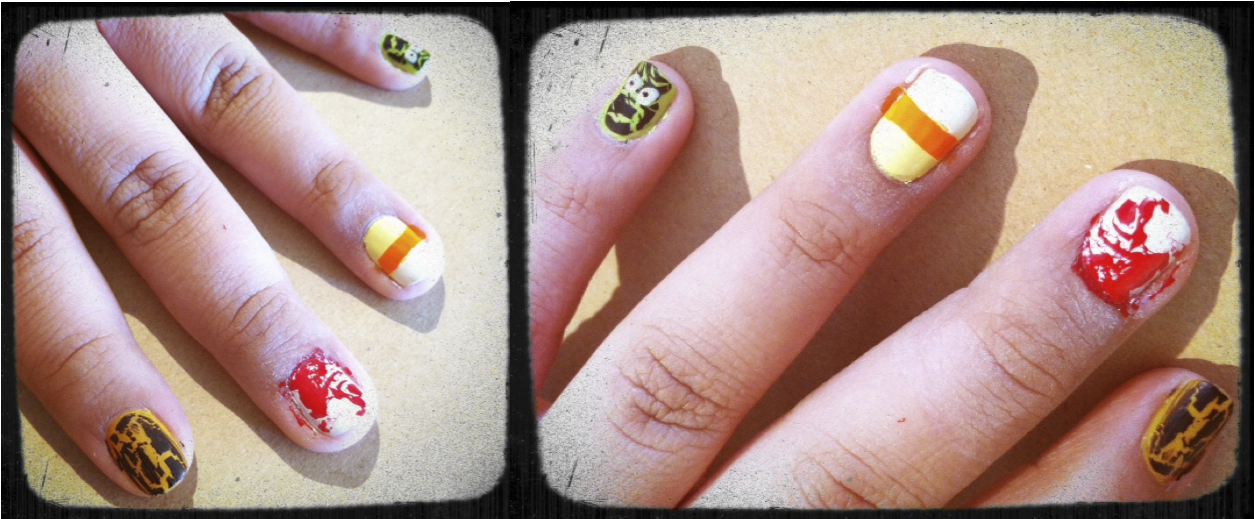
Then there's the classic Candy Corn nail art....these are so fun to rock.
Start with yellow polish (all over).....wait till it dries and tape off two sections to paint orange & white. 
lilfrankies
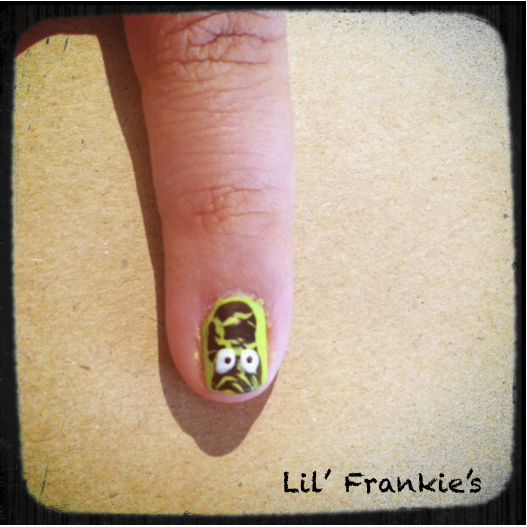
I love this one.....Lil' Frankie's! It's my take on Frankenstein...
Start with lime green nails...(if you don't have lime green, you can layer colors, i used a pastel green and layered a neon yellow over top)....add a black crackle polish. Once it dries take a dotting tool and white nail polish to make his eyes, add a small black dot to finish the eye.
bloodsplatter
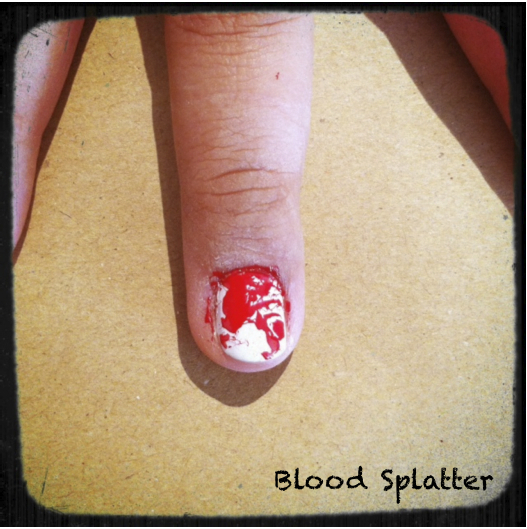
I had so much trouble with the blood splatter, but it turned out as my favorite nail. Once you get the hang of it, nothing can stop you!
splattermess
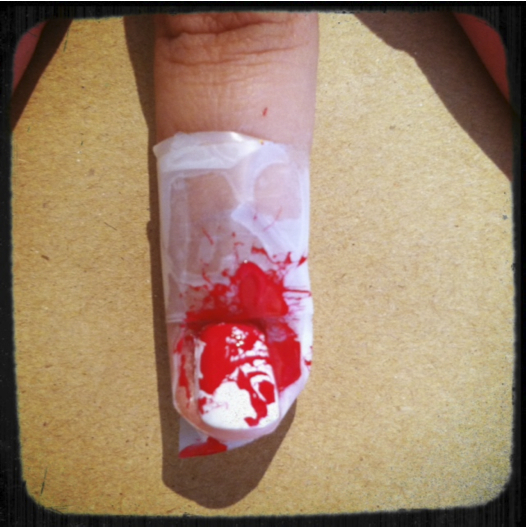
Make sure you tape off the skin around your nail, this is very messy.
(you may not want to use you favorite polish as this uses a lot)
The easiest way to do this splatter effect is to take a straw and dip it into your red polish. Take your straw out of the nail polish slowly,you should see a bubble starting to form on the top of the bottle. Once you see the bubble slide the straw slowly across the top of the bottle, so that the bubble stays in tact on your straw. Look at the straw and make sure there is a bubble on the end, if there is, move quickly over your white polished nail and blow through the straw onto your nail. The polish should burst out of your straw leaving a red mess all over your nails. Don't worry this is GOOD! Wait till the polish dries and then rip off your tape, revealing your awesome blood splattered nails!
spidewebs
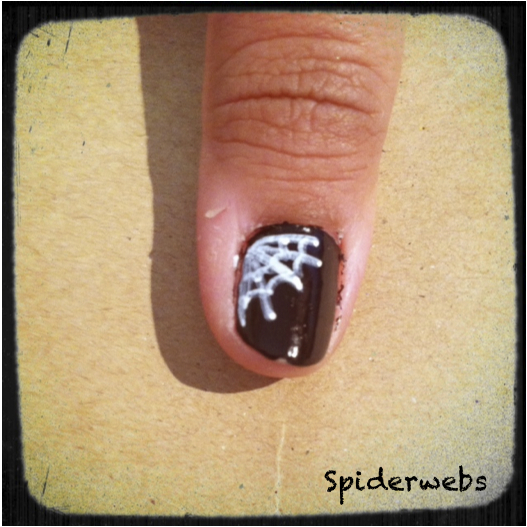
These spiderwebs nails are so fun!
Start with a color of your choice as the base color, i chose black. Using a nail art pen, draw a tiny spiderweb in the corner of your nail.  

Don't forget to protect all your designs with a top coat!
photo-16
rsz_pics2

9.06.2011

Nail It!

I am way excited for the Missoni for Target collection, Sept 13 cant come fast enough! I love all of their cute zig zag designs, I thought why not put em on my nails! They are so perfect as accent nails, plus they'll add a little flair to your outfit! 
rsz_1missoninails1
missoninail

Tools:
scotch tape
6 nail polish colors (your choice)
nail art brush 
dotting tool or toothpick
nail polish remover
clear top & base coat

Step 1- Start with bare clean nails, apply a base coat and tape off your nail into 3 sections. You should use very thin strips of tape.

Step 2- Start painting your 3 main colors in the 3 sections you just taped off. (I am using a baby blue, an orange-y pink and a maroon) You can choose any colors you would like.

Step 3- After your 3 sections of main colors are dry, carefully peel off the tape. You should have 5 sections now, 3 with colors and 2 blank. 

Step 4- Start painting another color of your choice into the 2 blank sections, (I am using a yellow). Im using a nail art brush, but you can use the nail polish brush, it will work just fine. Don't worry if you make mistakes, the zig zags were gonna create will hide most of them.

Step 5- Once your 2 sections have dried you can start creating the zig zags. I am using a copper color, and drawing the zig zags with a dotting tool. Apply the zig zags in between each color, this will make the design look cleaner and more uniform. For the zig zags you are gonna need to use very little polish, this will make it apply smoother and not so clumpy. If you don't have a dotting tool, the top part of a needle or a toothpick will work great.

Step 6- Apply the second color of zig zags, I am using a dark brown.

Step 7- Now you'll want to clean up any polish on your skin for a cleaner look.

Step 8- Once your design is dry apply a top coat. I used my design as an accent nail. I took a color from the design and painted the rest of my nails with it, you can do this if you'd like or continue on all your nails. 

Step 9- And your Done! I tried to stay true to the colors in their particular pattern, but feel free to use any colors of your choice! Have Fun!
rsz_pics2

9.01.2011

How To: Leopard Print Nails

Now that we are in the midst of fall (YAY!) it's time to change up our nail polish. I love wearing dark colors, it makes me feel all cozy. 

Since leopard print is gonna be HUGE this fall i thought i would show you guys how to do leopard print nails. These are perfect for fall! I know my fingers will be rockin' these A LOT!

Here are 2 easy ways to achieve leopard print nails....

leopardprintnails1
STYLE #1
Step 1- Start with your nails painted in the color of your choice for the background of the leopard print. I used Revlon's Copper Penny.

Step 2- Take a second color of your choice ( I used Revlon's Hot for Chocolate) to start painting the leopard spots, make sure not to use too much polish. A thin coat is all you need. These can be as messy or as clean as you'd like. Make sure they are all different shapes and sizes. Add some little dots in any empty spaces. 

Step 3- Take either a nail art pen or small nail art brush and start outlining the spots. Draw little C's on the outside of the spots, making sure they are all different directions and sizes. You can also use a toothpick, it works just fine! I used the black Kiss Nail Artist pen.

Step 4- Continue outlining all your spots. Make sure to not enclose any of the spots with the outline, there should be many gaps around all the spots.

Step 5- Apply a top coat, and clean up any mistakes.

Step 6- Done! 

leopardprintnails2
STYLE #2
Step 1- Apply the color of your choice for the background of the leopard print to your nails. I used Revlon's Siren.

Step 2- Take your nail art pen or brush and starting in the center of your nail draw two C's.

Step 3- Staying near the first 2 C's you drew finish the leopard print with many more C's. Continue this all over your nail. Add little dots in any empty spaces.  

Step 4- Apply a top coat and your Done!
rsz_pics2

7.19.2011

Link it up!

clicklinklove1
  • I recently was shown this video thanks to my friend Benji (thanks ben!!) It's so hilarious and has MAJOR stars making HUGE cameo's. If you like the Beastie Boys this link is for you and if you just like A list celebrities acting hilarious well then click away.
  • Michelle Phan is genius, I mean what greater compliment can you get. They called Einstein a genius for crying out loud. Its HUGE!! (your welcome Michelle) I love all her videos and especially this one. I love this summery look she did and I'm determined to rock this before summer is over. Can't get enough of her!
  • When I watch this flash mob video it ALWAYS makes me soooo happy. I mean grin from ear to ear even a little teary eyed  happy. Don't say I didn't warn ya
  • I recently stumbled on the blog Dear Photograph. It's so neat, and fun to look at all the pictures and messages!  I'm dying to send in my own!
  • I am determined to master this water marbling nail art.....but until then I'll settle for these strawberry nails!
    Hope you like some of our favorite links....we still have ton's more up our sleeve so stay tuned till next week! 
    LKM

    Don't forget to follow us on TWITTER & BLOGLOVIN

    7.06.2011

    Nail Trend

    Hello Everyone, I'm Marissa from Style Cusp....

    When it comes to my nails, I have an utter obsession with keeping them perfectly manicured and prettily painted. I refuse to walk out the door with chipped up polish or even naked nails. Though your nails are such a physically small part of your whole ensemble, they have the uncanny ability to speak volumes about a person. At least, I think so.

    I am constantly changing my nail color (in case you haven't noticed in my outfit photos) and giving myself manicures. It saves time and money, both of which are precious to me. I usually designate a specific time during the week (such as during a tv show) to sit down and do my nails. My girlfriends and I often get together for our favorite shows and have nail parties! It's a great time to do your nails.
    nailtrend1
    Lately, I've been just as into bright nail colors as I have brightly colored clothing. I've been rotating between bright yellow, bold blue, mint green, purple (not pictured here), and coral for the last month or so. But then, I got a little tired of just these shades and wanted to spice it up a little bit. Cue: new nail trend: paint your ring finger a contrasting color. At first sight, I didn't think I would like this trend. I had seen it out a few times on some other girls and thought it looked too tacky. But after trying it? I love it! It's a fun way to change up your manicure, especially if you're the type who can't decide on just one color (Ahem, me).
    nailtrend
    For shades like this, I opt to purchase cheaper drugstore polishes rather than designer ones. All of these pictured above are Sally Hansen XTreme Nailwear via Target and are no more than $3 a pop. Perfect for a nail polish splurge! I can get a good week's wear out of this polish, along with a clear top coat. The XTreme wear is probably some of the best drugstore polish I've tried!

    What do you think? Do you like the nail trend and would you try it yourself? With color blocking being such a huge trend, why not color block your nails, too?

    Thanks to The Style Dossier for letting me guest post, feel free to check out my blog, Style Cusp!

    xx,
    Marissa

    6.30.2011

    Say it Again

    thursday
    thursday2
    thursday1
    thursday4
    thursday5
    Lace Shirt- Forever21/ Button Up Shirt- thrifted/ Shorts- F21/ Gold Bracelets & Heels- F21/ Cluch- DIY

    This is the first time this summer i've worn shorts....such exciting stuff happening today, right! How this is my 1st time wearing shorts this season is beyond me, especially when Texas reaches 150 degrees everyday. These shorts are so comfy, they are kind of stretchy and really soft...their just right!

    I wasn't sure about this pairing of tops, but then i read, in the latest issue of Glamour, a quote by Gabi Gregg of, Young Fat and Fabulous, that said "stop saying i wish i could pull that off, and just do it!" So today im taking her advice. I must say, i'm liking this pairing very much! Twice this week i've worn something a certain way i'd been admiring but never dared, and the results have been awesome! You should try too, we all need to get out of our comfort zones sometimes!
    rsz_pics2

    6.29.2011

    spice up your life

    13_1
    13
    Shirt- Forever21/ Pants- WalMart/ Heels, Bracelets & Necklace- Forever21

    It just so happens 13 is my favorite number (Taylor Swift's got nothing on me!) and it's suiting that this is one of my favorite outfits. Ive been loving the "necklace over a buttoned up shirt" look for some time now, i just never tried it. I thought i couldn't pull it off, but i feel like it works. Especially with my "Carrie Bradshaw" bun. What say you?

    I love this shirt! It's so flowy and light, it's a size medium and it still feels a little big, way to make a girl feel skinny Forever21....props! 

    Did you notice my nails? Their such a fun polka dot design. I'm doing a ladybug nail on Libby tonight, perfect for summer! Do you have any favorite nail designs? 
    rsz_pics2

    6.25.2011

    Readers & Stripes

    11
    11_1
    11_2
    Jeans, Neclace, Heels & Sweater- Forever21/ Top- thrifted/ Readers- Claires

    I love stripes. Stripes...stripes...stripes! They are like polka dots to me, they take every outfit to that next level. I especially love them paired with prints. Alas, i'm wearing just a brown top, but i did pair them with my printed nails. In an attempt to make my gold manicure last i shattered my nails. Did you know if you paint the shatter polish on from different angles, you get different shatters? I know right....awesome! Well hopefully my manicure lasts another few days but then i am so doing this on my nails!
    rsz_pics2
    Related Posts Plugin for WordPress, Blogger...