Showing posts with label how to. Show all posts
Showing posts with label how to. Show all posts
7.18.2014
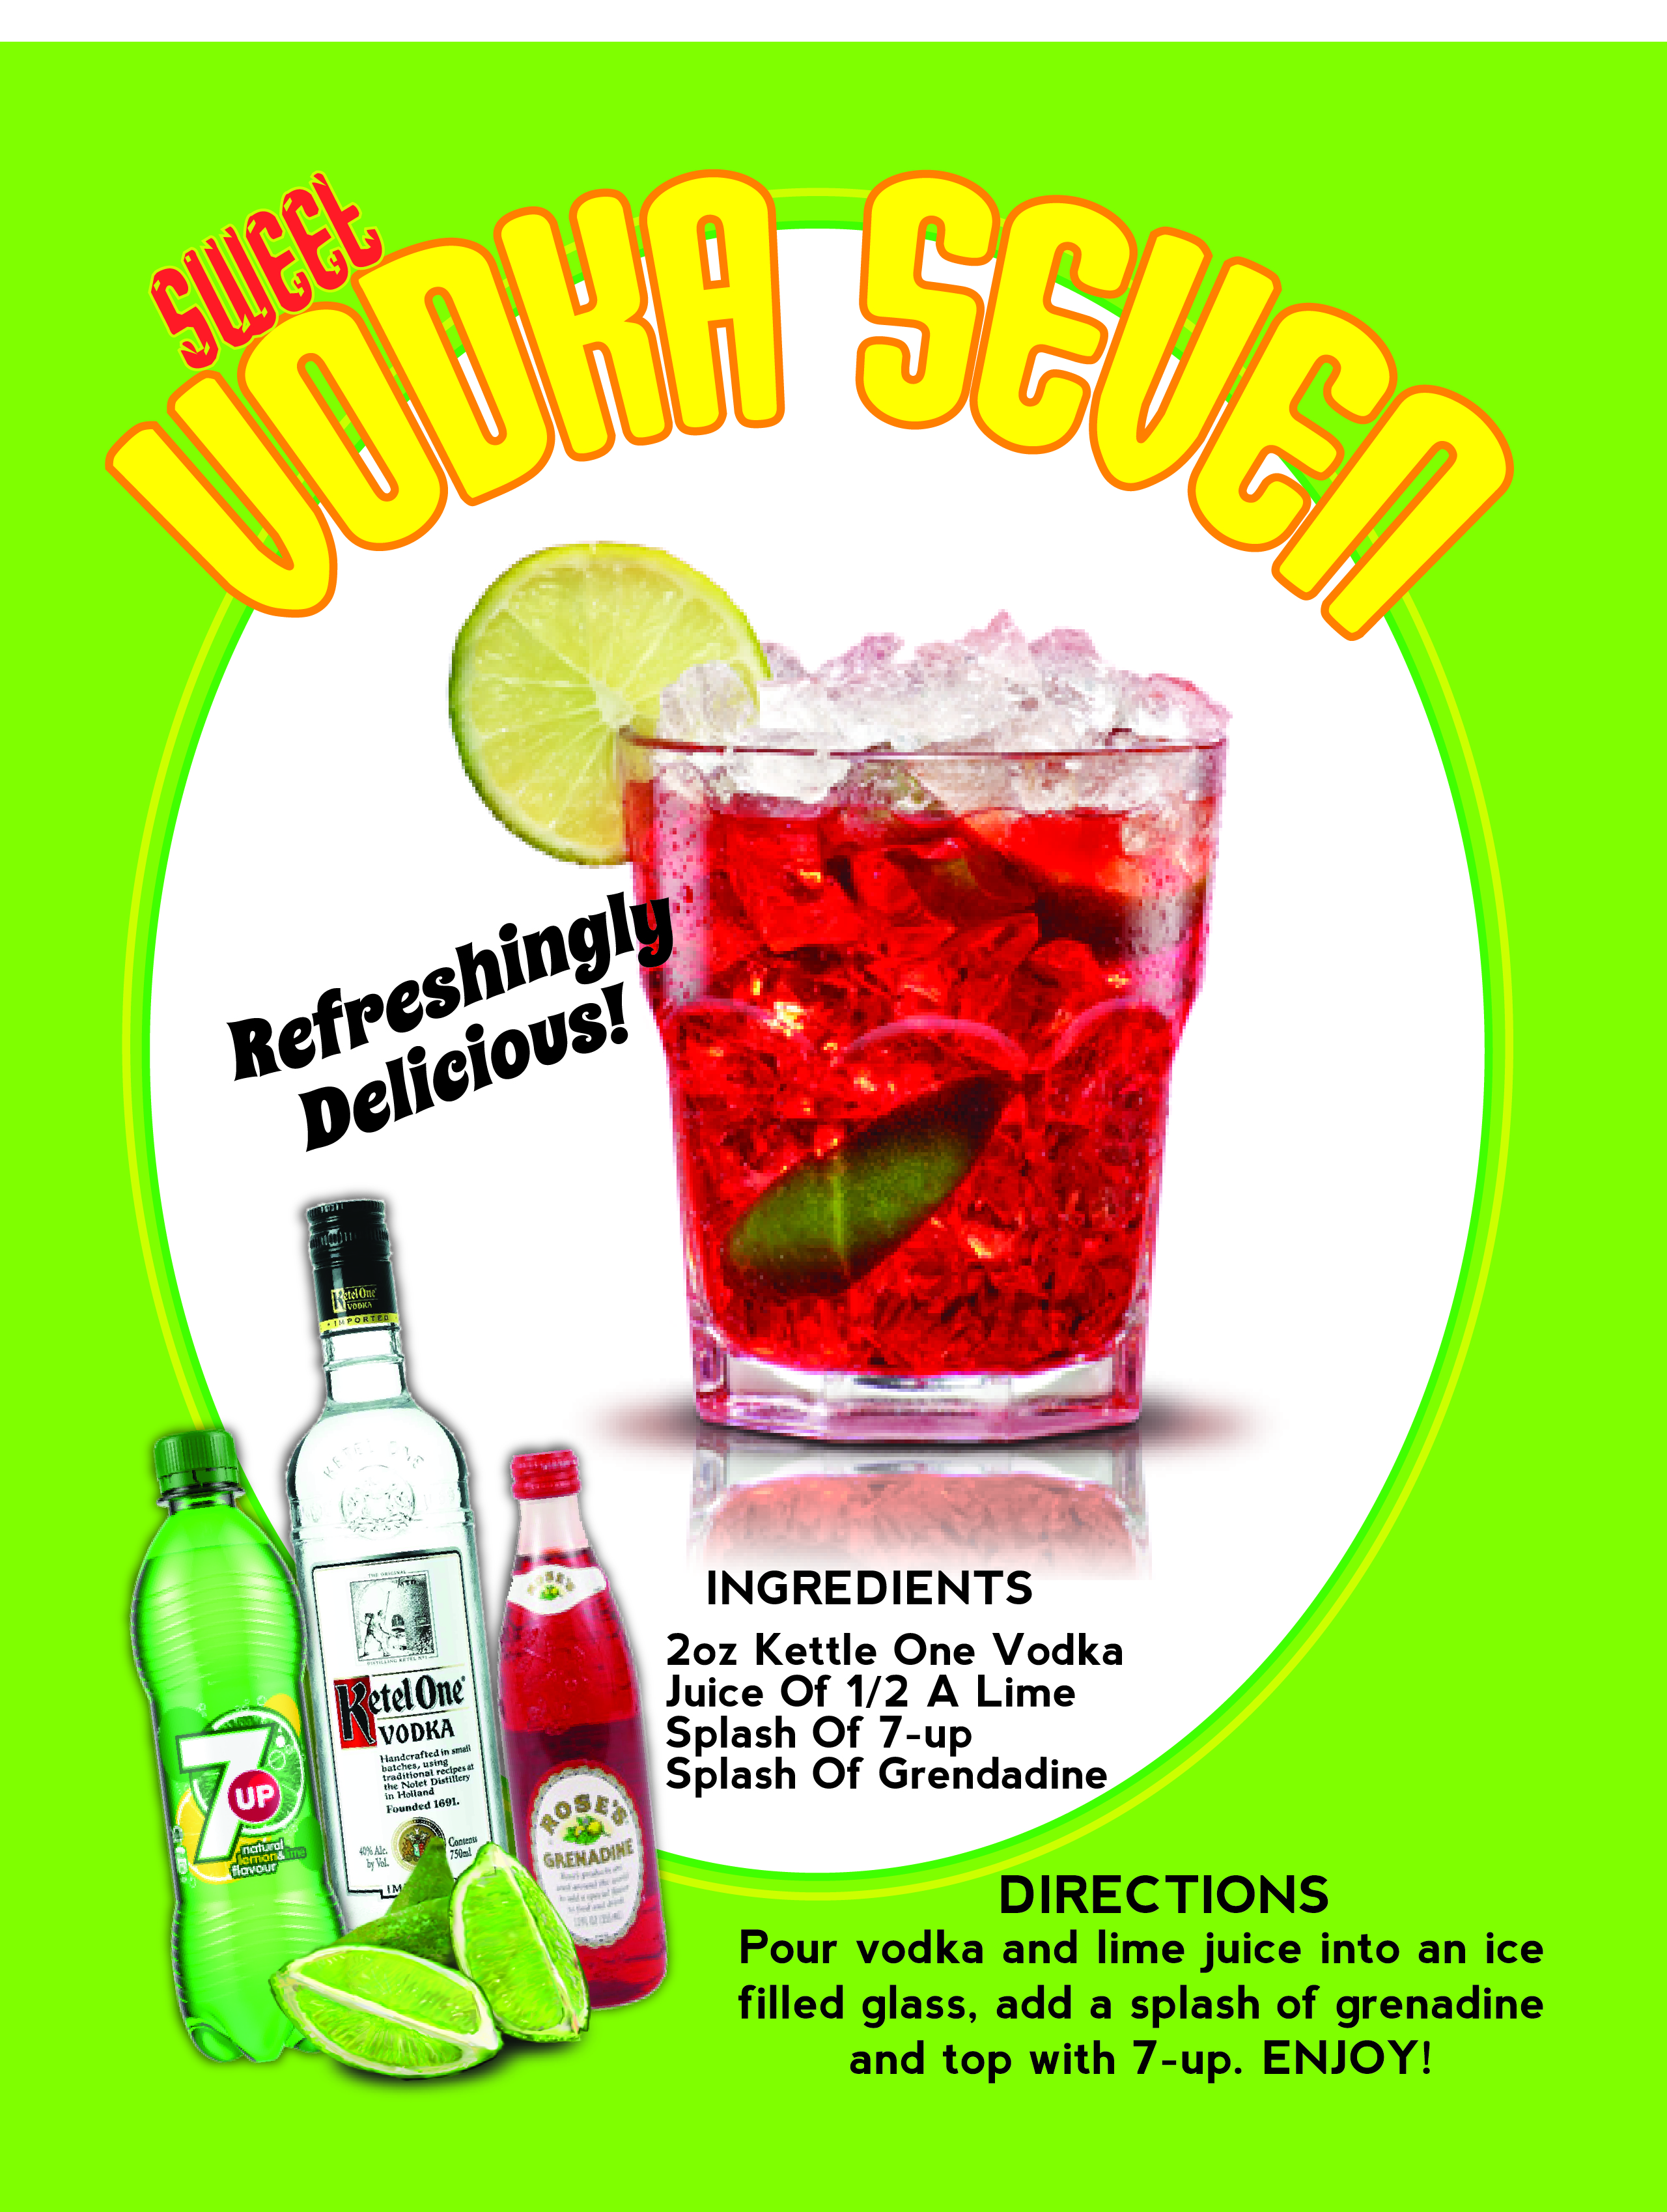
Sweet Vodka Seven
7.14.2014
Raspberry and Thyme Tom Collins
We're going all "American Hustle" on you this time. You know us and cocktails, making and of course drinking them just comes as second nature to us. We could do it in our sleep (maybe) we've never tried but challenge accepted! The annual San Antonio Current Cocktail party is coming up, and it's 70's theme! Its pretty perfect for us because we love men in white suits i.e John Travolta. So, keeping with the theme we decided to take the popular drinks of the 1970's and add a little Dossier flavor to them. First up, the Tom Collins, which is just perfectly fine, but we needed to get more "groovy" with it. Insert the raspberry and thyme. It's a great drink with lots of great flavor, the raspberry and thyme simple syrup takes this drink to a whole other level. Not to mention it's such a pretty color. Mix some of these up, put your bell bottoms on and get your boogy shoes ready!
3.28.2014
The Secret Behind Dry Exfoliation
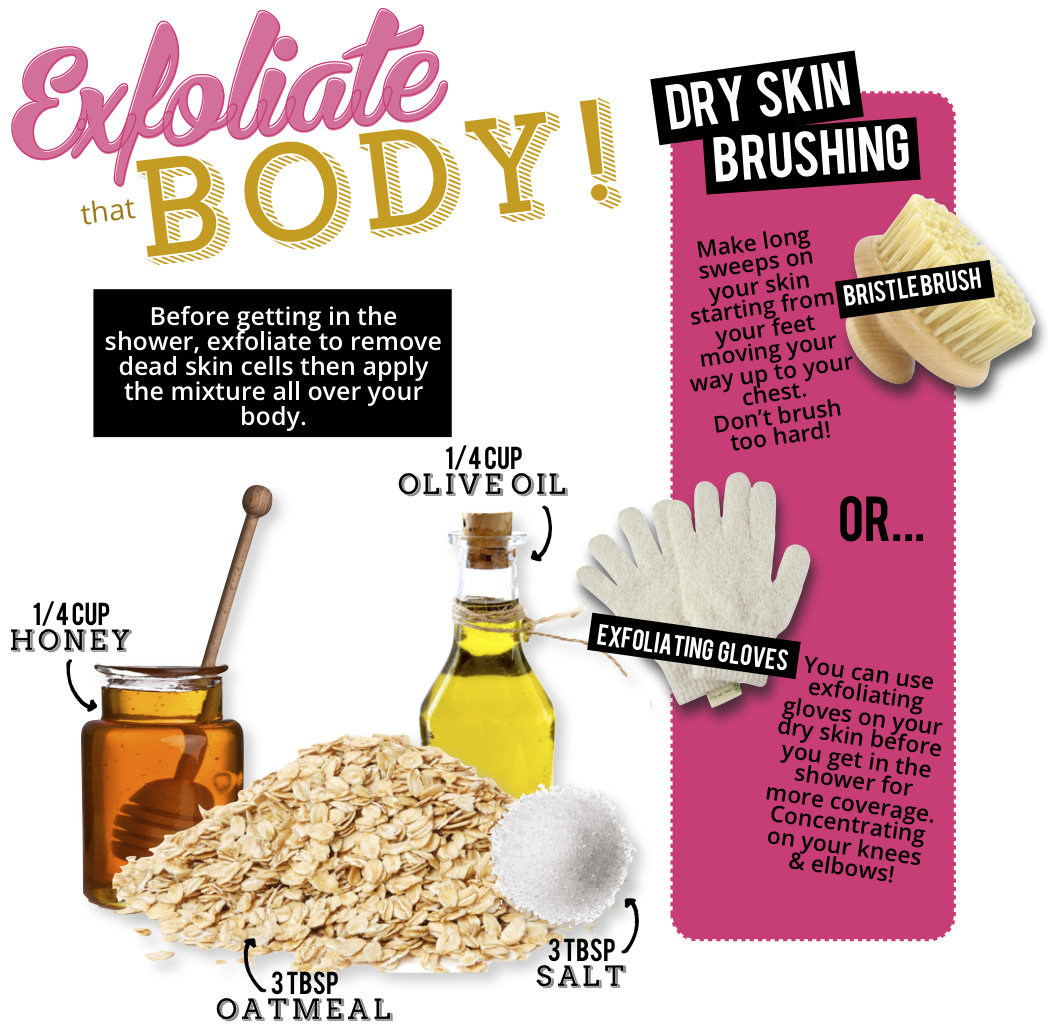 What if I told you that you could get rid of cellulite just by brushing your skin? Got your attention huh? Ok listen up ladies I read a few things about this method in Shape Magazine.
:Dry brushing increases the circulation to the skin which COULD possibly reduce the appearance of cellulite. Cellulite is toxic material gathered up in your body’s fat cells. So, instead of taking drastic measures like liposuction, just utilize the dry skin brushing techniques to help break down unwanted toxins?
This may sound to good to be true! Basically all you have to do is take a few minutes before you get in the shower or just in your spare time and brush your skin. Not only does it help to break down the fat cells it also gets rid of the dry skin to show off your new, radiant skin. It makes your skin feel alive!! You'll just see all those nasty dead skin cells fall off and after you apply a body oil you'll be screaming "hallelujah."
I found this method at the perfect time. Everyone (including me) are trying to get beautified for spring/summer and this method does two things at once. I know it may sound harsh for your skin but trust me it's all worth it! Do this method daily for a month and once you start to see those "dimples" go away you'll be really happy you tried it out. I'm VERY into exfoliating dry skin, heck I even exfoliate my dry face. For the record my face feels
A-M-A-Z-I-N-G!!
Labels:
beauty
,
DIY
,
dry brushing
,
dry exfoliation
,
how to
,
skin
,
spring
,
spring beauty
,
summer
,
summer beauty
1.17.2014
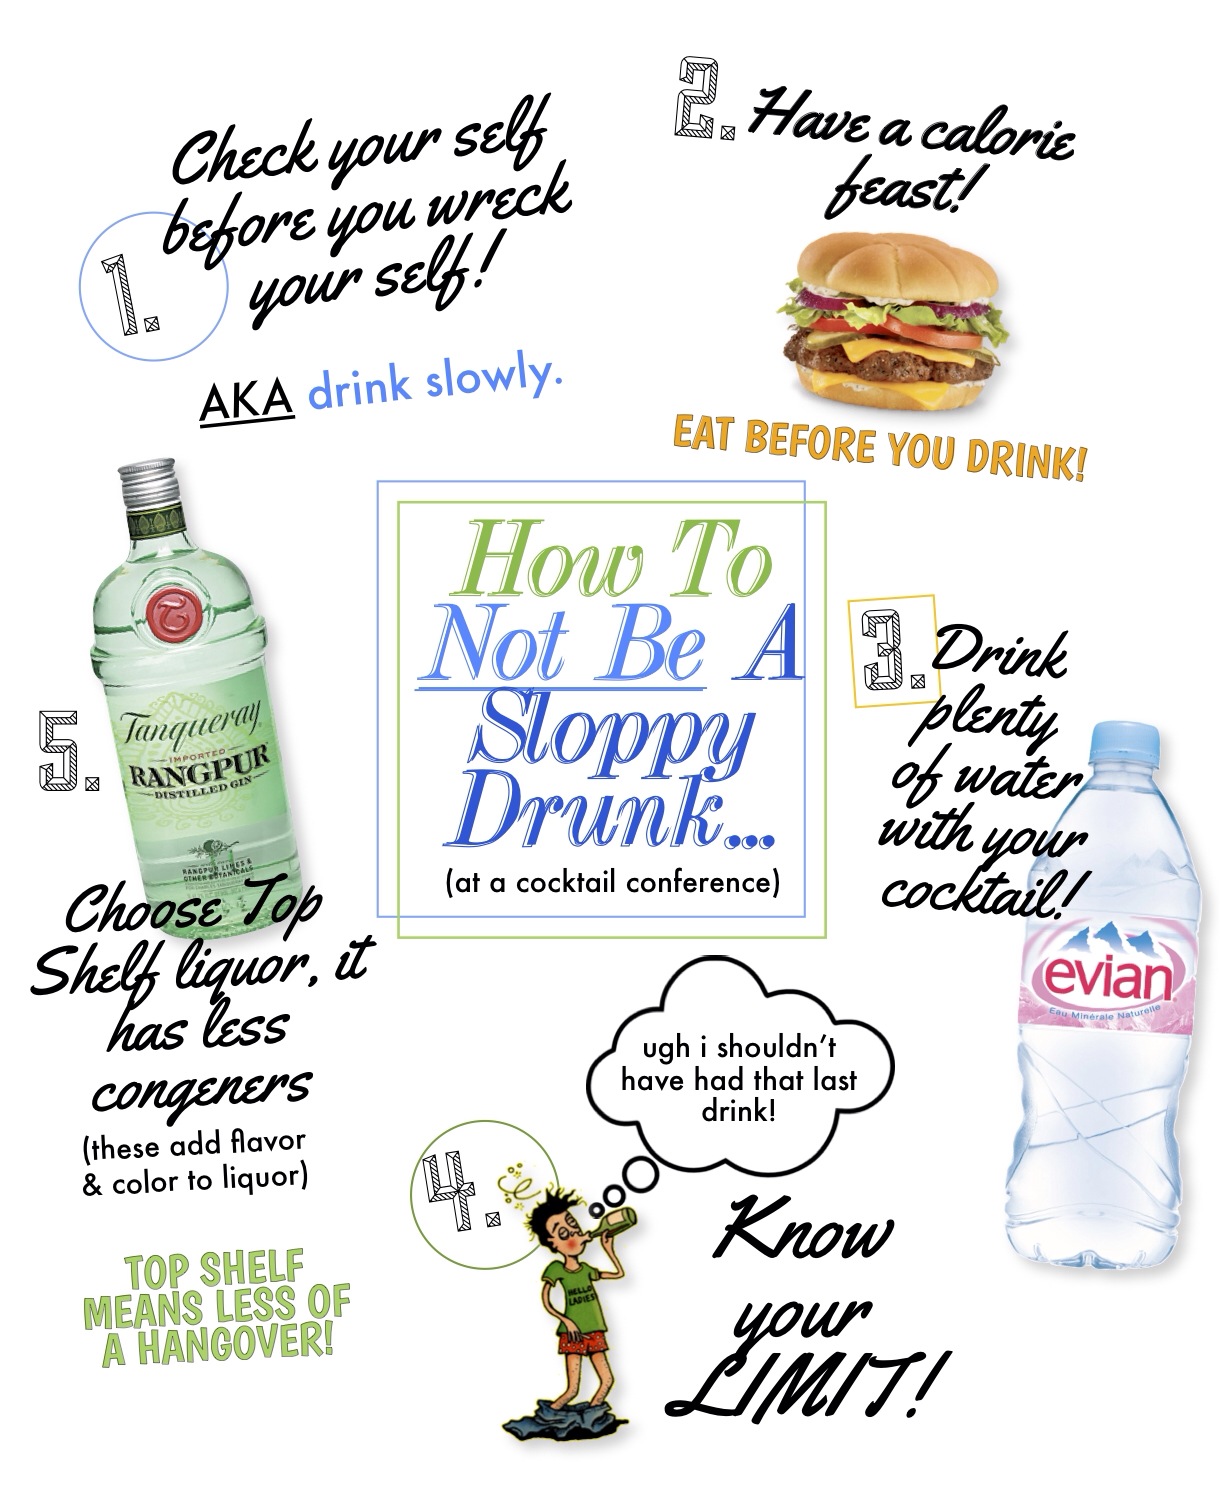
How To NOT Get Sloppy Drunk
Lets be honest for a minute ladies and gents, if you signed up for the Cocktail Conference this month you probably planned on getting a little more than tipsy, am I right? We knew it. Now, we know that the main reason for this conference is to try a million and one cocktails that you haven't tried before, but we're here to save you from looking like Lindsey Lohan. Seriously its not cute, nobody likes a hot mess. Don't go down the road to tacky town. Take a detour and read this to help yourself NOT get sloppy drunk.
1.) Check yourself before you wreck yourself:
If you know the night or day your going to be having ahead of you will consist of more than one drink, plan on taking it slow. We all know drinking faster will get you drunk quicker, but that's a sure way to make you a human puke machine before 10pm. Nobody likes to babysit (we all know this) so drink sllloooowlllllyyyyyy. It's not a race its a marathon. Just remember you have all night, or at least till 2am.
2.) Have a calorie feast:
This just means EAT BEFORE YOU DRINK!! This just might be the most important rule to remember. Never and we do mean NEVER drink on an empty stomach. We get it, you want to stay fit. That's what the gym is for, not the salad bar before a night of hitting up all the bars. You wont make it to 2 cups of Jungle Juice before wanting to call it quits. If your dinner was a handful of almonds, expect to be hugging the toilet by the end of the night. Instead, order that double cheeseburger and spring for some fries too. You wont regret it.
3.) Get on that H20 game:
Having a glass of water between drinks doesn't make you a loser. It makes you smarter than all those amateurs pounding back cherry vodka sour's and taking fireball shots like "a boss". Matching a glass of water with the drinks you have is a good way to make sure you don't become "that girl". You know that girl. She's the one crying in the corner, or yelling at the bartender, or even worse, dancing on the bar when your nowhere near Coyote Ugly. Its alright to know that girl, just don't be that girl.
4.) Know your limit:
Bottom line. If you feel like your about to go exorcist on the person next to you, you've probably had to much to drink. We all know when were "feeling good" but if you take it to the next level and your friends have to carry you out of a bar because you thought it was a good idea to have 7 donkey punch shots in a row (not speaking from experience) well that's no bueno. Things to remember:
- Stand still. Is the room spinning?
- Can you feel your teeth?
- How many times have you said "Oh my god, I love you!" in the last minute?
If your answers were: Yes, No, and more than 7. Than your drunk. Stop drinking immediately!
5.) Be snobby:
This is probably the only time we will ever suggest you do this but if your set on not having a pounding headache in the morning you might want to consider it. We all know the girls that say "I don't drink beer" whatever. Don't be that kind of snob, but you can be snobby about your liquor. Top shelf liquor and clear liquor have less congeners (which is just a fancy word for chemicals that add flavor and color to alcohol) These liquors will still get you drunk but you'll have less of those sucky side affects in the morning. Fork over a little bit more money if you know you don't wanna sleep your day away the next day.
And if your a rebel and your thinking " To hell with all these rules! All I want to do is get drunk and not care!" Well, first off we would suggest that you calm the hell down before you go down the road only Amanda Bynes has traveled. Since your gonna be difficult we decided to go ahead and give you some alternate options that will free you to drink all night and not have a hangover in the morning. your options are:
- Pop a multivitamin, like B12 before you start drinking to replenish whats lost from alcohol
- Take some milk thistle. (sold at your local drug store) before bed
- We swear by this one, the holy grail, Chasers Plus. Keeping hangovers away for years. Pop one before you go out on the town.
5.01.2013
Silky Smooth Legs
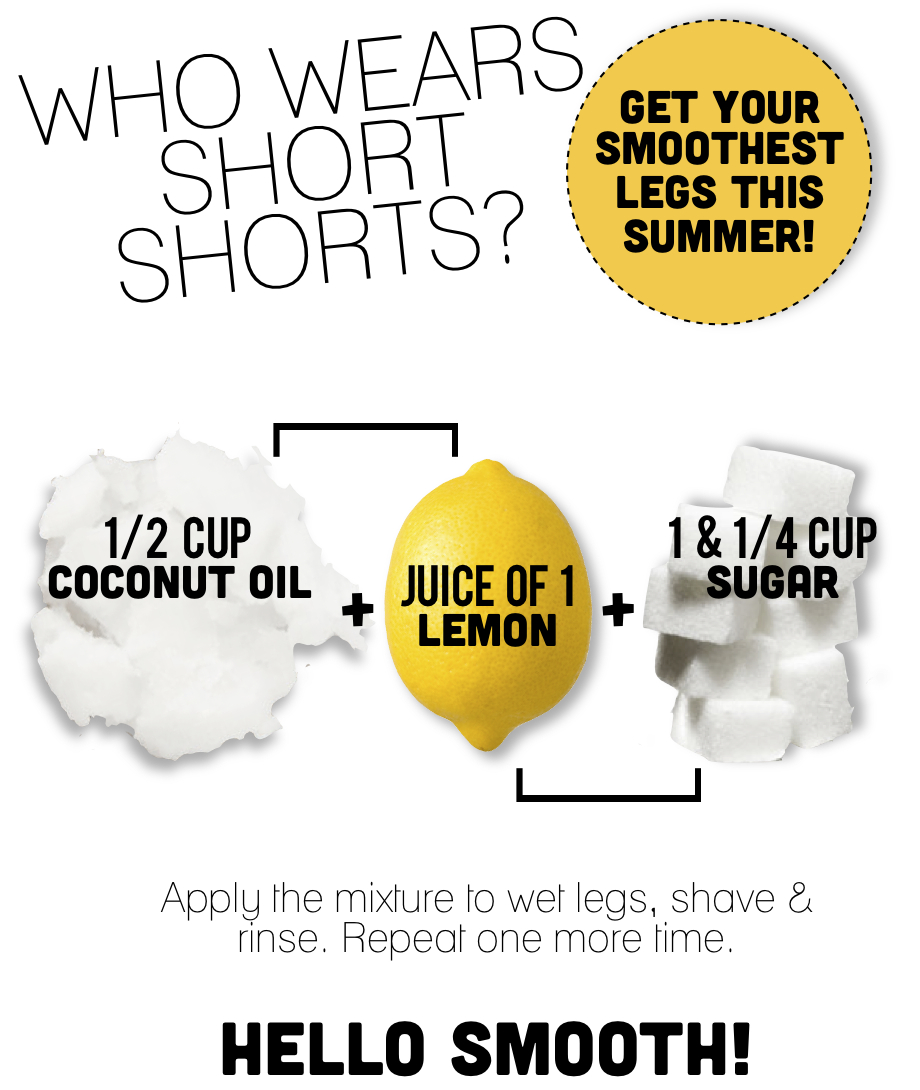
It's finally time ladies. Time for your legs to come out of hiding. Those bright colored skirts & lacy shorts now have their time to shine! We have something pretty great to pair with those short shorts. How about the silkiest legs ever? Trust me you won't be able stop touching your legs because they are so soft. This little concoction is made with three ingredients found in your own kitchen. It exfoliates & softens legs at the same time. Just mix up the ingredients, apply to wet legs, shave. Rinse legs & repeat the process once more. It's that simple. You don't necessarily have to do this every day either, just when you want those extra sexy legs. Which might just be all the time when you discover how great this is. In that case, Go for it girl!
PS: We'll be guest posting beauty tips every month for our friend Tanvi! This was our first post for her blog so make sure to go show her some love!
PS: We'll be guest posting beauty tips every month for our friend Tanvi! This was our first post for her blog so make sure to go show her some love!
8.27.2012
How to make your lipstick last longer
During the summer I rarely wear makeup & I pretty much don't touch my hair. Bronzer, lip gloss & sea salt spray are my best friends all summer long. Now that fall is right around the corner, I'm actually busting out my hair dryer & my red lipstick, aaaah I love fall! With all those bold lips making a comeback, I have some quick tips to get your lipstick to stay longer. Taking just a couple extra minutes is all it takes!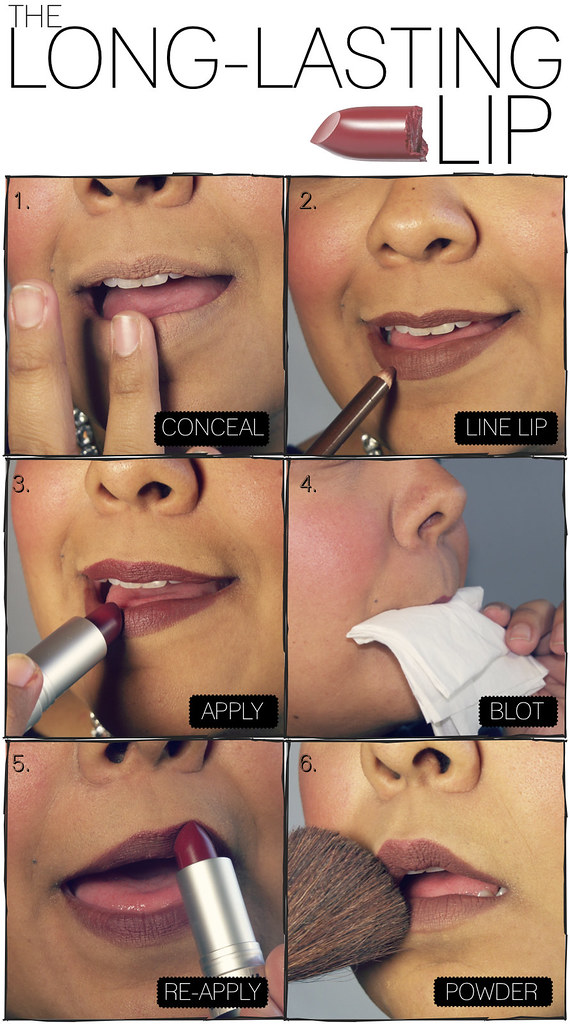
STEP 1. Take some concealer & apply it to your lips
STEP 2. Take your lip liner, a nude color or a color as close to your lipstick as possible, line & also fill in your lips. This will give the lipstick something to hold on to
STEP 3. Apply your lipstick
STEP 4. Grab a tissue & blot to remove any excess lipstick
STEP 5. Reapply your lipstick, to build up the color
STEP 6. Take a fluffy brush & dust a little bit of translucent powder on your lips & you're done!!
8.20.2012
Fall 2012 Makeup Trend: Flushed Cheeks
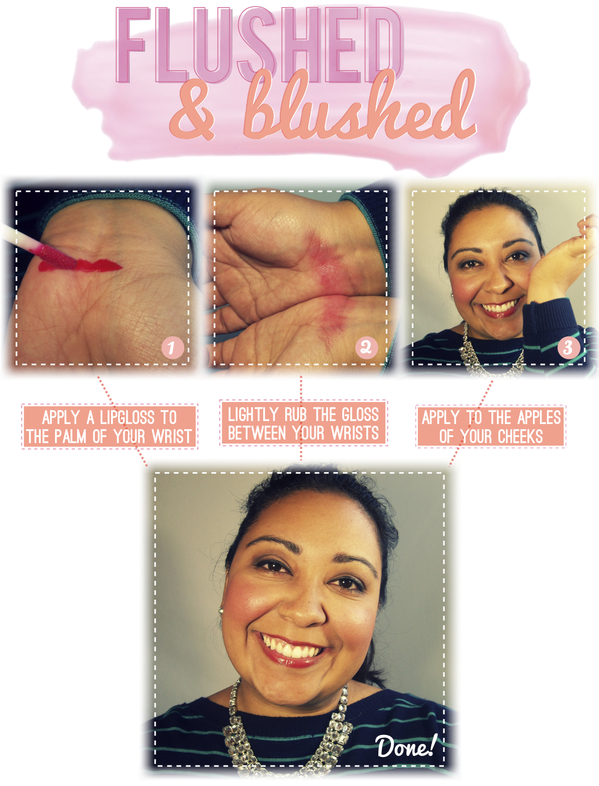
Just thinking about fall gets me extremely excited. We finally get to break out our boots, our blazers maybe a scarf or two, but most of all, I get sooooo excited for all the new beauty trends. This fall it's all about flushed cheeks! Dick Page, Michael Kors lead makeup artist said, "It's how you look if you've been skiing, or in a hot tub or having very good sex", if that doesn't make you want to get flushed, i don't know what will! It's a really easy look to achieve & I learned a quick technique that makes it THAT much easier.
*I used a lipstain from IMAN, but any lipstick or gloss will work!

8.07.2012
How to do kitty nail art
When i saw these kitty nails on pinterest I knew I had to try them. They are so easy, and so fun! If you love cats as much as me you'll for sure want to try these!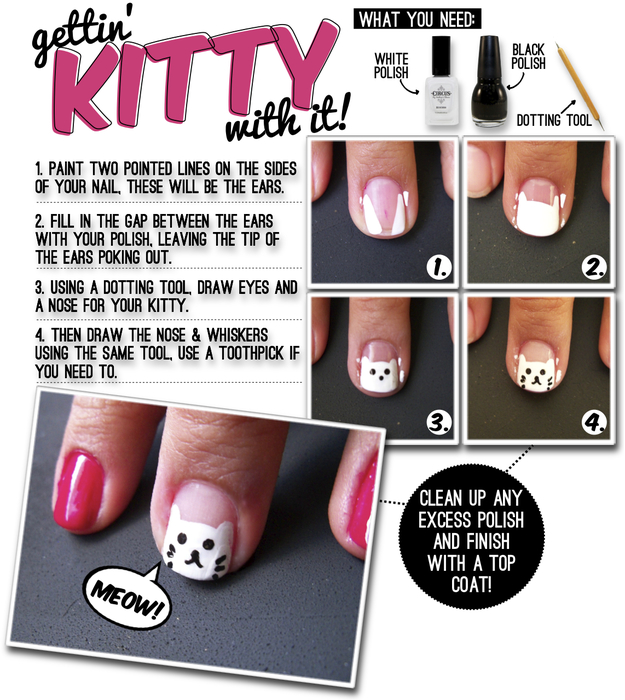 Step 1. Paint two pointed lines on the sides of your nail, these will be the ears.
 Step 1. Paint two pointed lines on the sides of your nail, these will be the ears.
Step 2. Fill in the gap between the ears with your polish, leaving the tip of the ears poking out.
Step 3. Using a dotting tool, draw eyes and a nose for your kitty.
Step 4. Then draw the nose & whiskers using the same tool, use a toothpick if you need to.
Done!

7.13.2012
Strawberry Infused Vodka
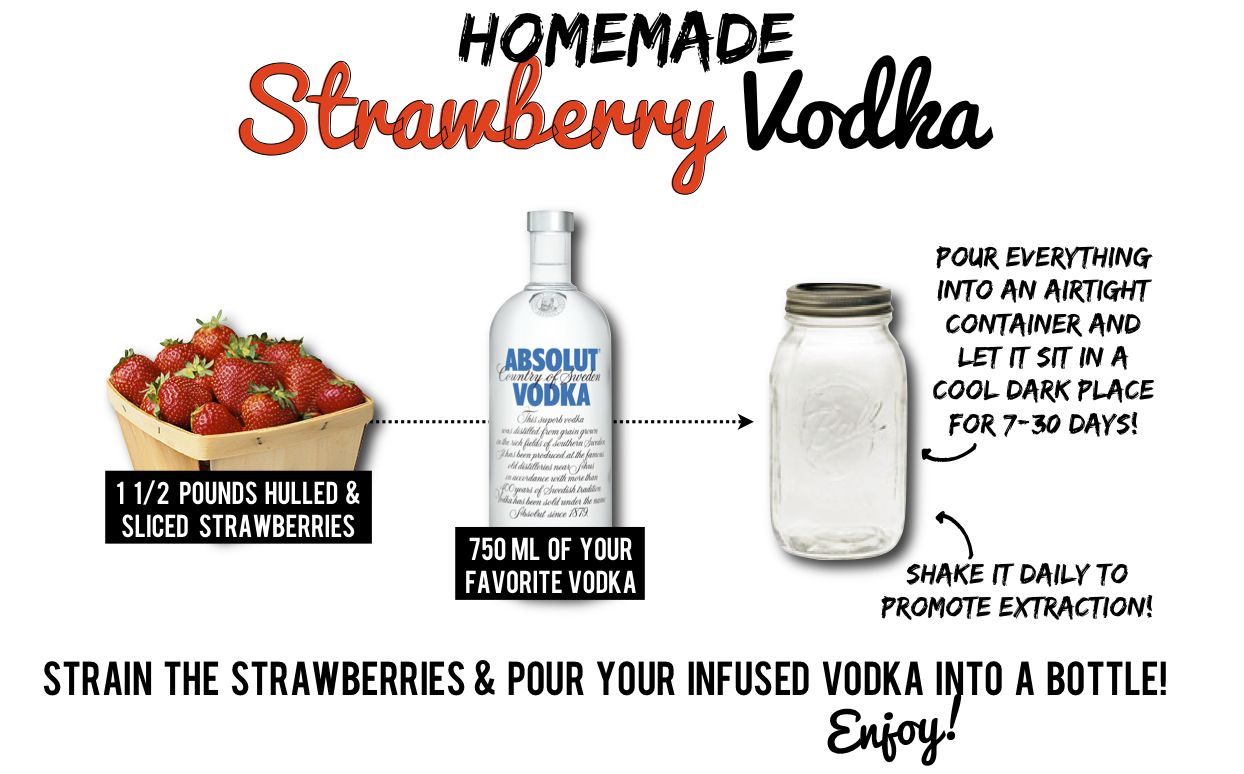
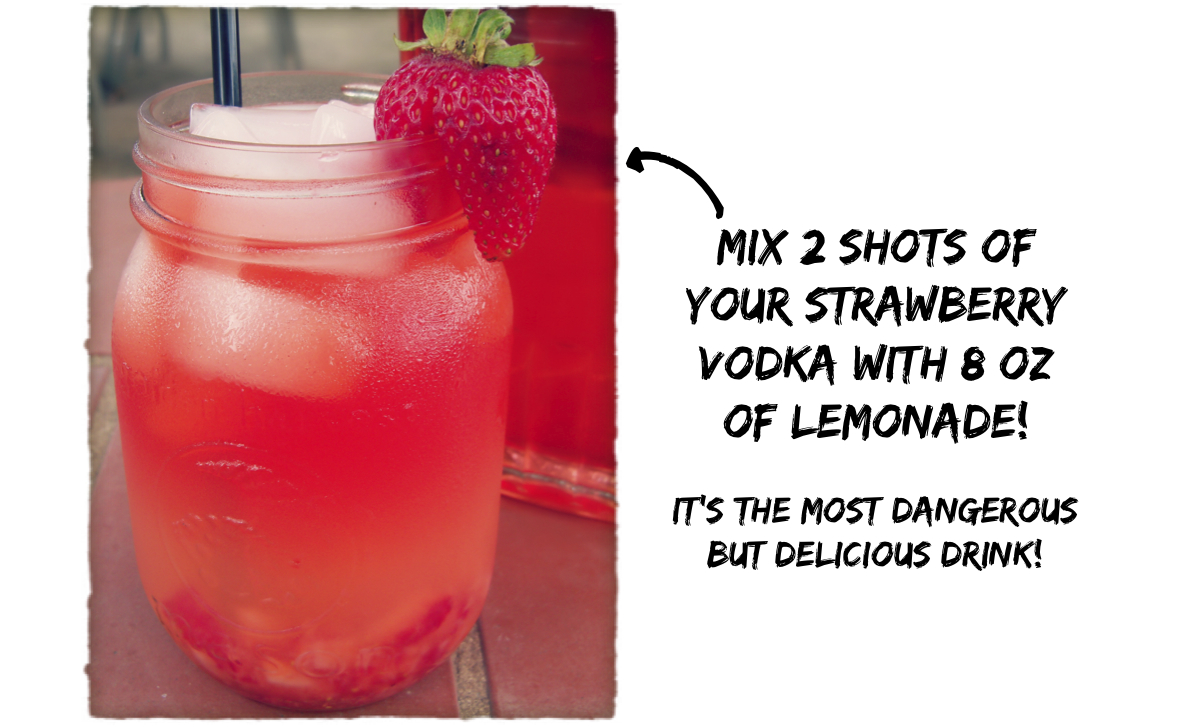
From now on you can refer to me as Katy the mixologist! No, really I would love that. Between the Jolly Rancher Vodka and now this Strawberry Vodka, I'm practically a pro! The truth is this vodka is anything but hard, a little time consuming but none the less its suuuuper easy! Make it, shake it, strain it, and drink it. Four easy steps to delicious vodka goodness! Enjoy a ton of drinks with this vodka and its sure to make your summer that much sweeter!
Enjoy everyone!

Labels:
how to
,
infused vodka
,
strawberry lemonade
,
strawberry vodka
,
summer
,
summer recipe
,
vintage posts
7.12.2012
How To Do Water Marble Nails
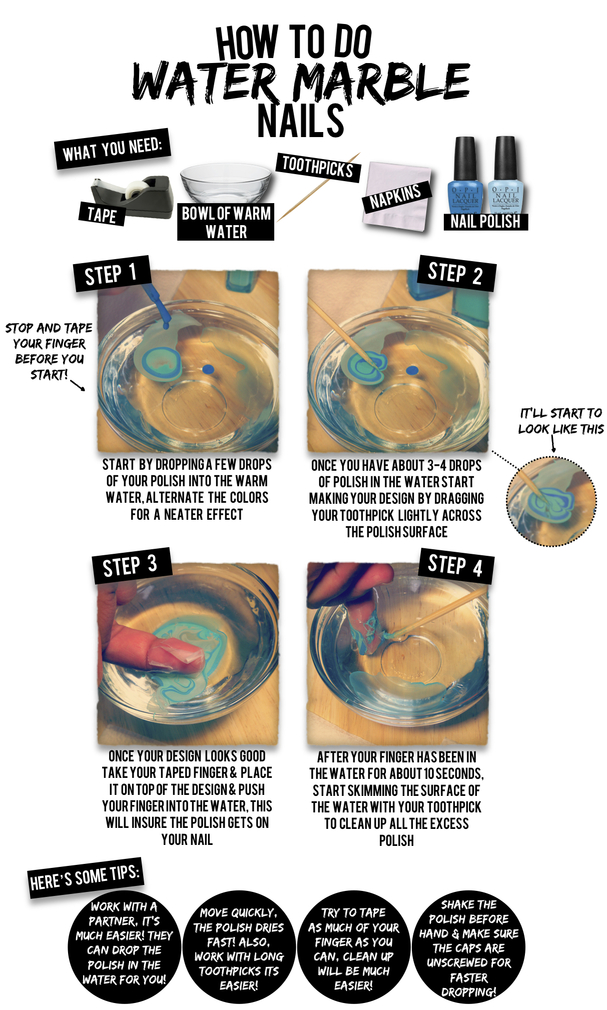
WARNING if you don't have a whole lot of patience we suggest you step away from the computer. This tutorial can be a little challenging & take up a LOT of time. Luckily we had a few hrs to kill, & trust us it took us a loooong time to get this tutorial right. We've done just a few nail tutorials but this Missoni nail was by far our favorite. Katy & I were wracking our brains on which nail tutorial should be next. Why not Water Marble nails? The only thing is we heard it was hard (everyone was right by the way) But you know what after all the complaining the nails actually turned out pretty damn cool!! Every design is different so you never know what you're gonna get. We chose to just do it as an accent nail but if y'all want to try & do all of your nails more power to ya!
7.11.2012
a FRUGAL gals dream!
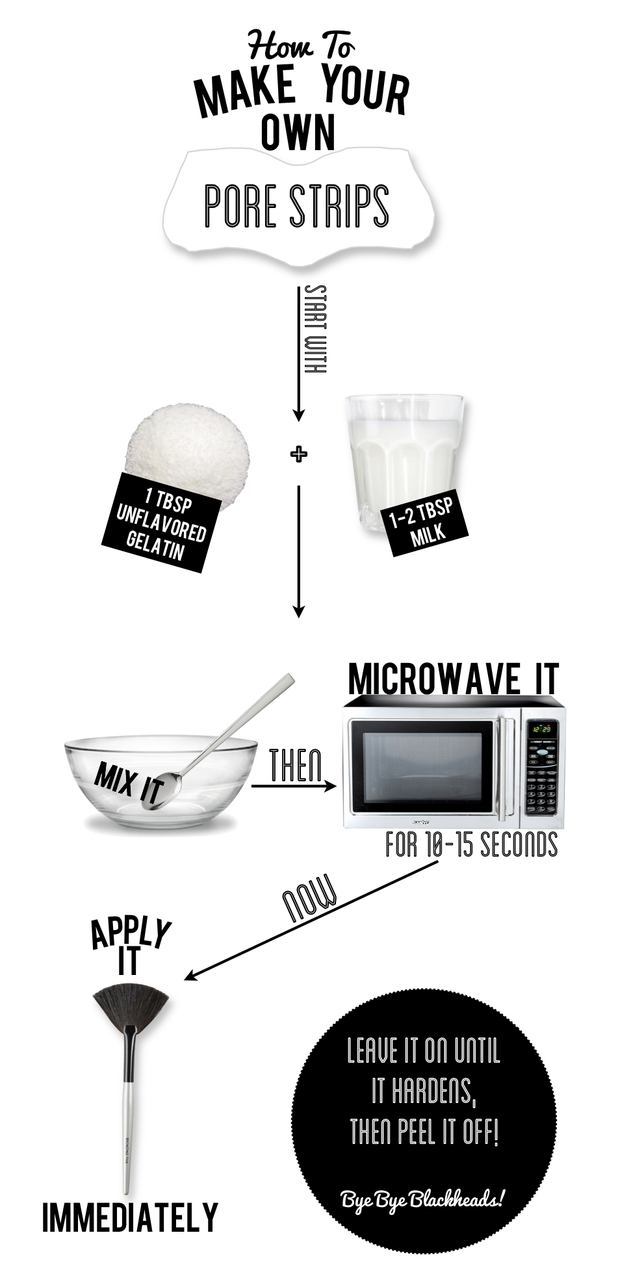
I'm what you call a frugal gal. I don't like to spend a lot of $ & if I can make it I will. So this post was & still is PERFECT for me. It requires no time @ all & you need just two ingredients. By the way did I mention it cost nearly nothing! Homemade Biore Strips are the latest craze, ok so I just made that up but it has saved me a ton of $ & trust me they really work!
6.27.2012
How to get a smokey bronze eye
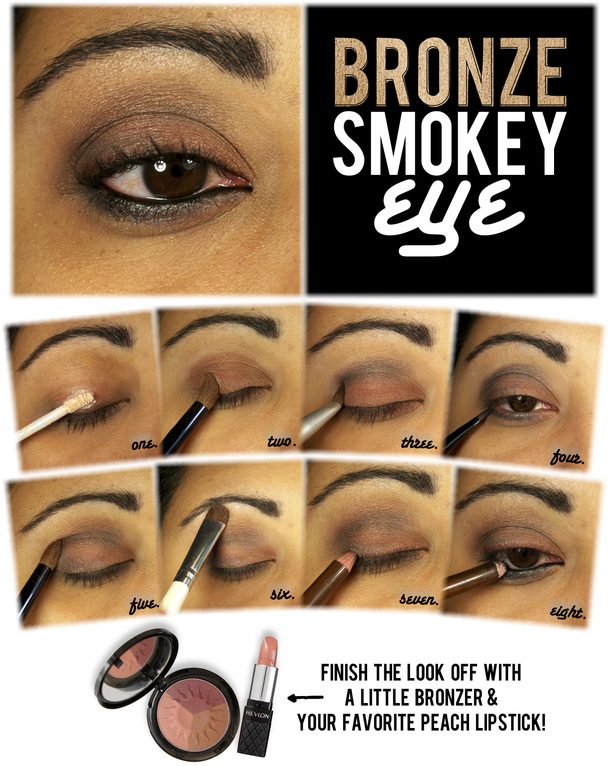
For summer I keep my makeup to a bare minimum. Bronzer, lipstick & mascara is pretty much all I need, but sometimes I want to venture out. This bronzy smokey eye is perfect for "venturing out" & its done in just 8 steps. You need just a few products & voila' your eyes have a totally fun, summery look. I'm totally turned off by all those tutorials that take 20 minutes or that have a million & one steps. That's why I wanted to keep it laid back & easy. If I can do it so can you!
STEP 1. Prime your eyelids. I like to put a little primer underneath my lower lash line as well
STEP 2. Take a bronze color & put it all over your top lid
STEP 3. Take a nice grey color (try to stay away from black, you want a softer look) Apply it to your crease & your outer corner
STEP 4. Take that same grey color & apply it underneath your lower lash line, blend well
STEP 5. Take a bigger fluffy brush & make sure to blend your top eyelid as best as possible. You don't want any harsh edges
STEP 6. Take a lighter color, a highlighter, & apply it right underneath your brow bone
STEP 7. Take a brown eye pencil & very lightly line your top lash line. I like the softness of lining my eye very very lightly
STEP 8. Take a black pencil & line the inside of your WHOLE eye. Don't let any white show inside your eye
This video was my inspiration, hope it helps!!
This video was my inspiration, hope it helps!!
6.11.2012
Simple Beachy Hair
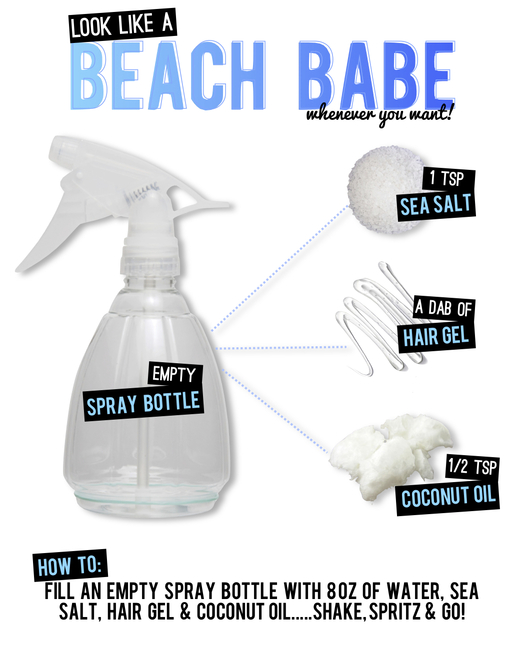
One little fact about me, during the summer I almost NEVER fix my hair. I know what you're thinking, but don't worry I still wash & brush my hair (although some people may disagree) I just love to go for that "beachy messy hair" When summer rolls around I pretty much keep my blow dryer 20 feet away. If I can go all summer with no heat on my hair I'm extremely happy. I just wash, spray in some beachy texturizing product, that I make myself btw & I'm off! It's just my little way of bringing the beach to me every single day!
5.28.2012
Bronze Goddess-How to apply bronzer
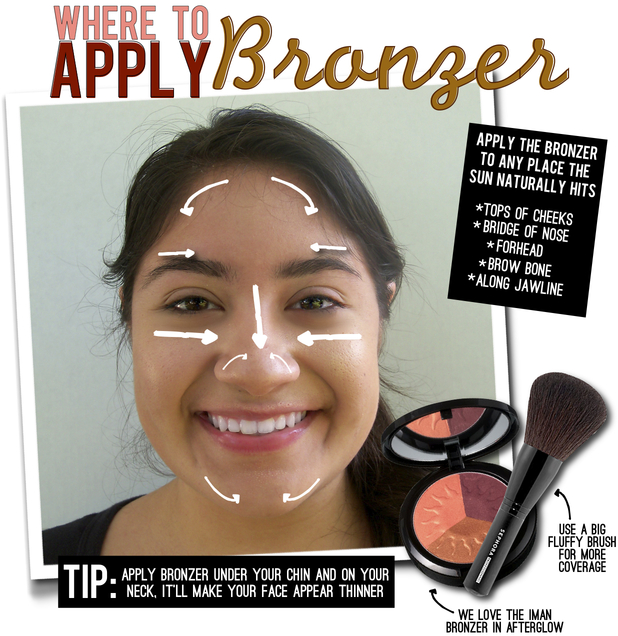
Bronzer is slowing becoming a must have in our makeup routine. I think we might have turned our little sister onto it too. Bronzer is so easy to put on & it does wonders for your complexion. When you put on bronzer just think of places the sunlight hits your face & that's where your bronzer needs to go. Use a big fluffy brush & put it along your forehead, above your brow bones, the tops of your cheeks, under your chin & a little on your neck. It takes no time @ all to put on but it makes a HUGE difference. Bronzer I think I love you!
5.08.2012
Sugar Baby
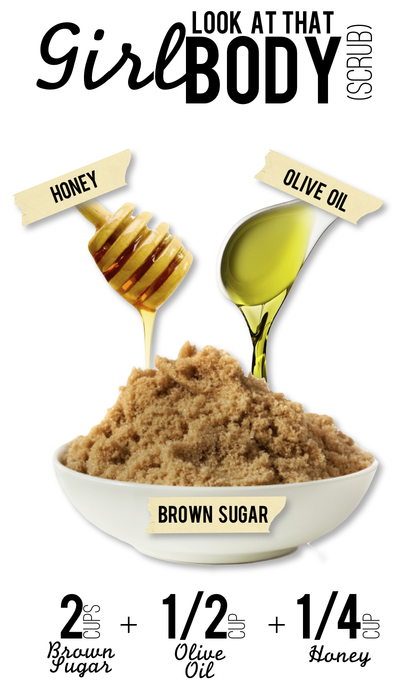
First off there's something I need to say. Katy is a GENIUS! (that is probably the only time I'll ever say that too) She is the mastermind behind all the graphics on the blog. We come to her with an idea & bam she goes above & beyond our expectations. Thanks Katy the blog wouldn't look as good as it does without you. Now excuse me while I go wipe my "brown nose" :) Now back to the post. This scrub is my absolute favorite homemade body scrub. It makes my skin feel so radiant & healthy. It's so easy to make & did I mention it's cheap. (that's a word I love to hear) It's made up of products you can find right in your kitchen. The brown sugar exfoliates & clears away those dry, dead skin cells. Plus the brown sugar gives you a youthful glow & it moisturizes & conditions your skin. This scrub gets extra bonus points because it smells so yummy! This is an all over body scrub but it can also be used on your face every other day. Just make sure to be extra gentle when you use it on your face. Trust me I use this on my face & every time I do I get some kind of compliment, who doesn't want that?
*this scrub lasts for a good while @ room temp no need to refrigerate it
4.18.2012
Milk Maid Braids for shorter hair
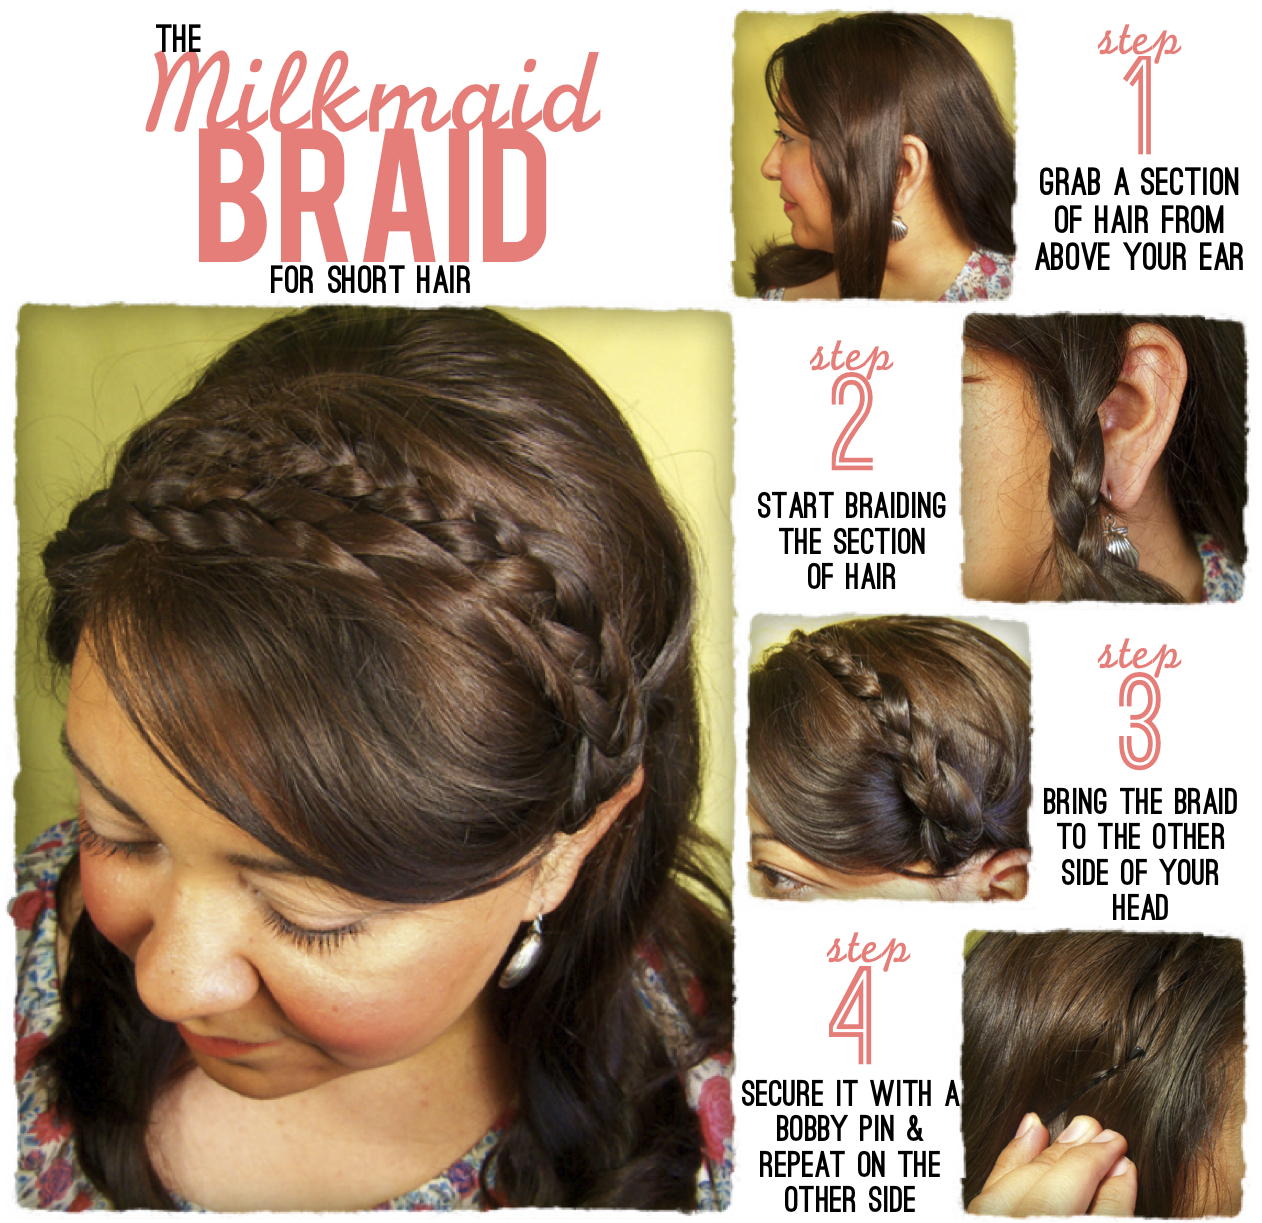 Let's face it finding hairstyles for shorter hair is a little difficult. Now that katy recently cut her hair we're all ridin' the "girl's with short hair" train. Hey in this Tx heat a girl needs a major haircut! I miss a lot of styles I used to do with my longer hair. The one style I miss the most is the milk maid braids. Now I have to resort to a little imagination to come up with "shorter" hairstyles. This hairstyle is incredibly easy. All you need is bobby pins & some hairspray. So from now on just call me Olga!
STEP 1. Grab a section of hair from right above your ear. Don't worry about the rest of your hair you're going to leave it down anyways.
STEP 2. Start braiding that section of your hair. I like to start braiding right where my ear is.
STEP 3. Take that piece of hair that you just braided & bring it to the opposite side of your head.
STP 4. Once that braid is brought to the opposite side of your head secure it with bobby pins. Try to conceal the bobby pins as much as possible. Set with hairspray
*repeat these exact steps on the opposite side of your hair
4.16.2012
Rosy Posy
Spring is all about getting that healthy glow. What better way to do that than with a little bronzer & some rosy cheeks. If I could take one piece of makeup with me on a deserted island it would be blush. Ok maybe a good lip balm & my eyelash curler but hey who's counting. Rosy cheeks are so easy to achieve. You can even swap out that rosy color for a good peach blush & bam you have a
"just came back from the beach" look. Now go get GLOWING!!
By the way all the makeup I used is from IMAN, we absolutely LOVE their makeup!

"just came back from the beach" look. Now go get GLOWING!!
By the way all the makeup I used is from IMAN, we absolutely LOVE their makeup!

3.22.2012
How to do a fishtail braid
You know what I love? That braids are still all the rage. Any kind of braid is popular. My favorite braid is the fishtail braid, I can finally say its my favorite because I FINALLY accomplished it. It took me a good few weeks to get it right. But since my hair is shorter I can't necessarily wear a fishtail as a ponytail. I recruited my little sister Emily for this hair tutorial, she has the Rapunzel hair. Instead I have to resort to mini fishtail braids in my hair. That's ok I love mini braids in hair they add just enough fun to any hairstyle. Don't ya think?
STEP 1. Start by separating hair into two sections
STEP 2. Take a back piece of hair from the right section
STEP 3. Bring it around the front of the right section
STEP 3. Bring it around the front of the right section
STEP 4. Join it with the left section
STEP 5. Take a back piece of hair from the left section of hair
STEP 6. Bring it around the front of the left section & join it with the right section of hair
STEP 7. Keep repeating STEPS 2-6 all the way down till you reach the end of your ponytail. As you cross each piece of hair make sure to pull the hair tightly so it doesn't come undone.
STEP 8. When you reach the end of the ponytail tie it off with a rubber band
If it's easier tie your hair with a rubber band first than start your braid like Emily did with her hair. Also if you have shorter hair like mine use this technique for a mini fishtail braid
If y'all have any new braided looks don't forget to share them here. I love learning new ways to do my hair
3.19.2012
How to make an Insect Brooch
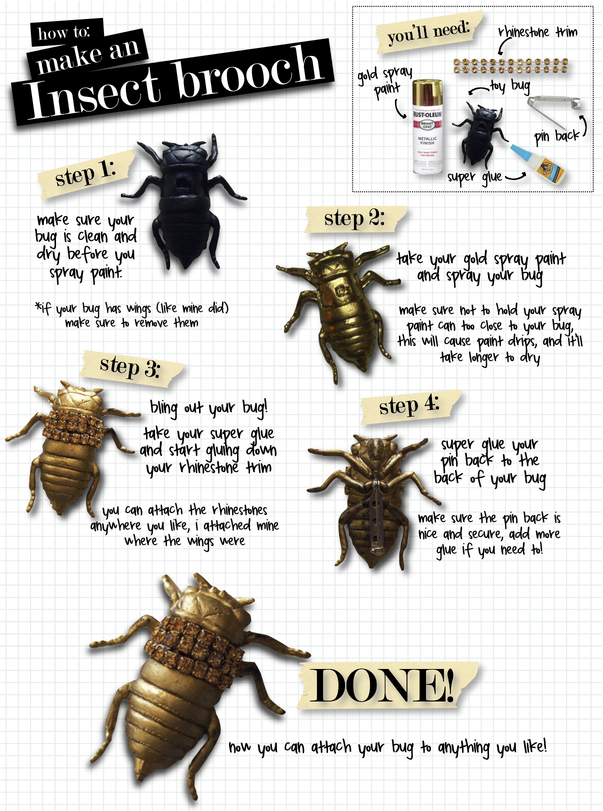
I have been lusting after insect jewelry since the beginning of the year. I first saw this necklace from Topshop on Cheetah is the New Black, and then i saw this really awesome brooch the Man Repeller was sporting! I decided i would try to make something rather than spend a ton of money. I think my insect brooch came out pretty good, especially because it cost under $10 to make! I've been wearing it on my purse and it is quite the head turner! If you try this Good Luck!

3.07.2012
Going Green!
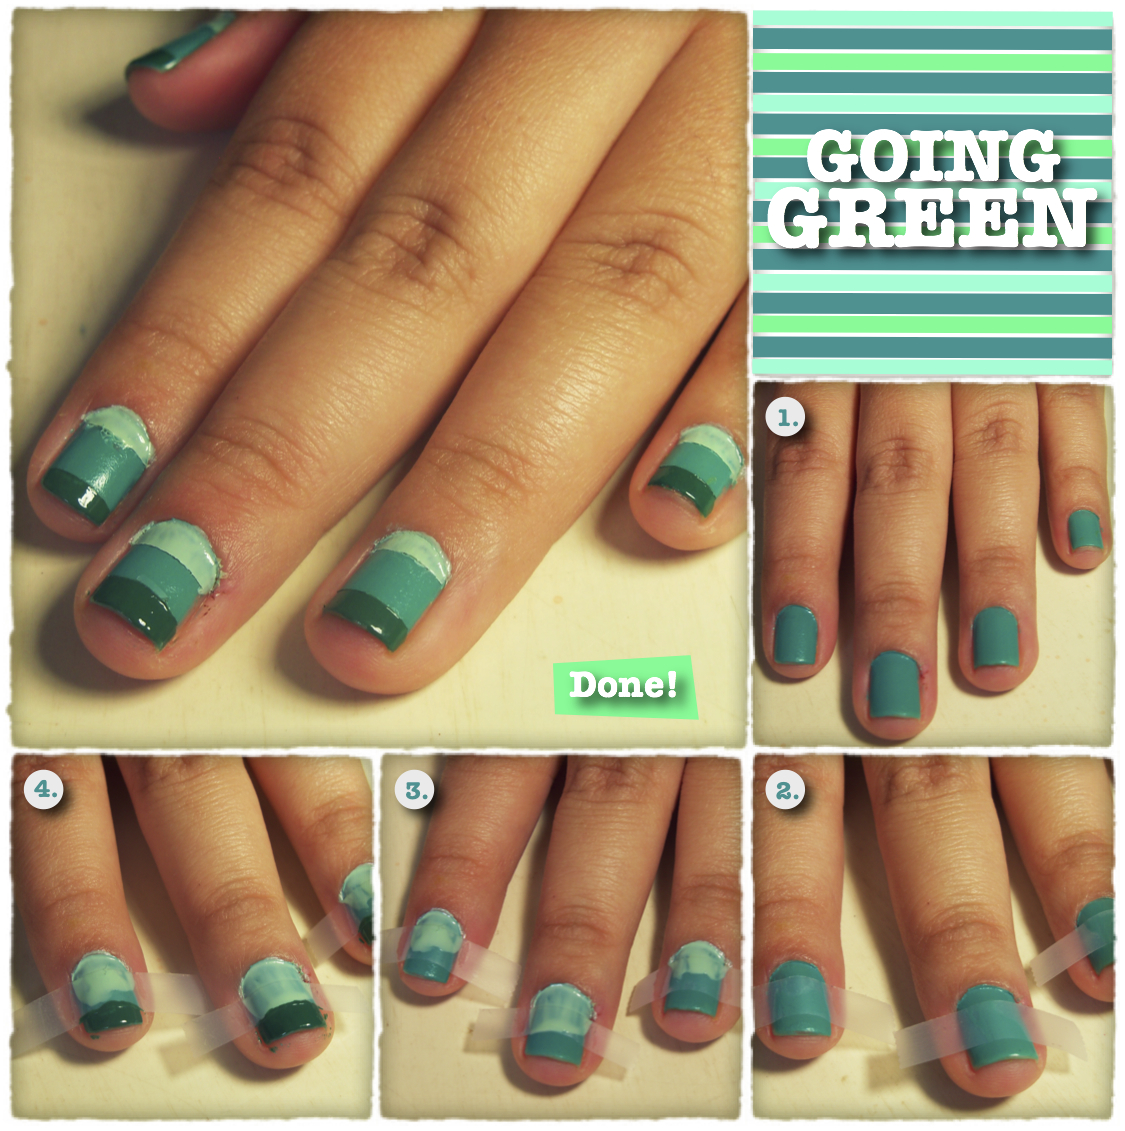
My nails are forever changing, and lately I've kind of been going through a design phase. One color just hasn't been doing it for me. Since St. Patricks Day is coming up I was thinking about what design I could do on my nails. Voila this is what I came up with!
Stripes with a sort of gradient effect makes for delicious nails -- right? yes!
(P.S. Sorry for the messed up lines on the finished product, thats what happens when you don't allow proper drying time. I know y'all are smarter than me so I won't worry)
1. Paint your nails with the color you want in the middle of the stripes.
2. Put a strip of tape in the center of your nail (you may need to cut the tape to your liking)
3. Paint your nails with the lightest green on the top part of your nail.
4. Paint the end of your nail with the darkest green.
(give a good amount of time for them to dry then peel the tape off)
Subscribe to:
Posts
(
Atom
)

